The way to prepare a “product file” is developed that allows to have, at the foot of the line, the adequate information for the correct manufacture of a container of the three pieces type.
INTRODUCTION
In every metal company, the products that it manufactures must be perfectly defined. For this purpose, it will have a series of standards, in the form of plans or technical sheets, where the characteristics (measurements, specifications, properties, materials, etc.) of the different types of containers, caps, capsules … that form its manufacturing range will be indicated. .
These standards, rather than specific pieces, define the unitary components that constitute a container or a lid, for example the type of tab used, cordon, closure … In this way the information to be handled is simplified, since a tab per container is not required but a standard by component type. The set of this information is usually presented in the form of a manual, which is defined as “Manual of manufacturing standards”, and is a tool used continuously in any Technical Office.
However, from the production point of view, it is not a convenient instrument to manipulate. At the foot of the machine a simple material is needed, but with the most complete information possible of the product that is being manufactured at that moment. Therefore, the use of an entire thick manual is not practical or manageable for mechanics and equipment preparers. They must have on hand a single file, which summarizes all the information they require on the spot, and only it without further additions. This will operate effectively and eliminate the possibility of errors and confusion.
SHEET
To cover this need, the Technical Office prepares the “Product Card”, which provides the necessary data so that in each phase or operation the necessary information is available to carry it out properly. For example, in the case of the manufacture of a “three-piece” type container, the reference of the raw material from which it is split, and the measures to be obtained from the container in each of the successive operations (cut , welding, rebarnizado of the welding …). In certain cases, these means will have a closer tolerance to respect at the time of regulating the machine. During series production, a greater range of tolerance can be allowed at the same level.
An important criterion to respect in the preparation of the “Product Data Sheet”, is that the dimensions or values that appear in it, and that have to be monitored during the production by the line operators, or previously by the preparation mechanics, are easy to determine, without the need to use complex equipment that requires a certain dedication or a long time, since operators usually do not have it.
We will go into detail in the definition of a “Product Card”. For this we will use a specific case.
PRODUCT SHEET OF A “THREE PIECE” PACKAGING
The example we are going to develop will be that of a very common container: ½ Kg of preserves, whose format is RO 73 x 110, that is to say a body diameter of 73 mm for a height of 110 mm. This container is usually manufactured with reduction of diameter in the bottom – notched – and corded body
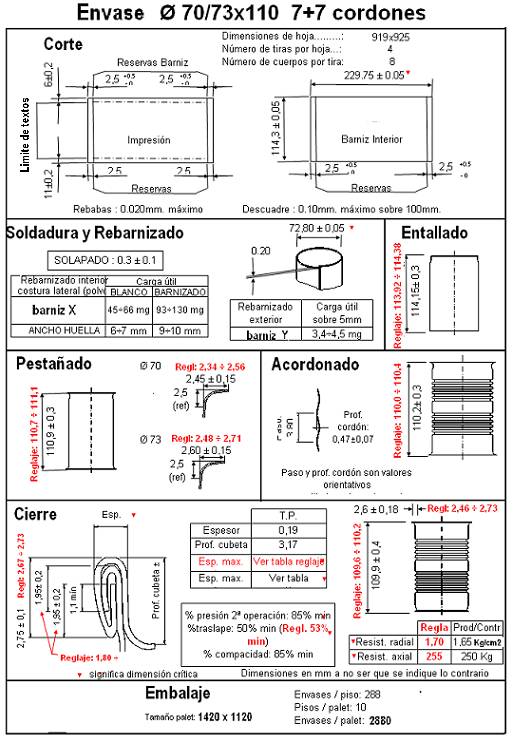
In the drawing no. 1, an overview of the “Product Data Sheet” of this container is presented. Then we will go into the detail of each one of the sections that compose it. For the moment, let’s stay with your general configuration. In a single document the basic data are reflected, to be taken into account in each of the steps, which are made on the line: Cutting, welding, rebarnizado, notching, flanging, cordoning, closing the lid and packaging. In all cases these are values to be obtained on the piece and therefore, although they are directly linked to the dimensions of the tools, they do not have to correspond exactly with them.
As we have already advanced above, on the card, certain measures or values are reflected twice, once in red to be used during the adjustment of the machine, and another in black that must be fulfilled during the manufacturing process. The measures that in each step are considered critical are marked with a red triangle.
Figure nº 1: Example of “Product Card”
Let’s go into the detail of each of the operations.
CUT
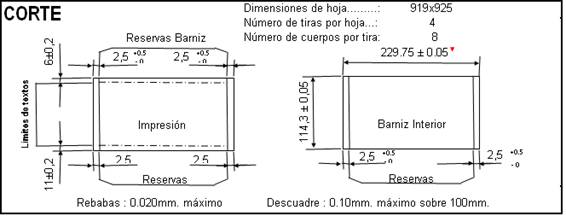
To adjust the circular shear to the appropriate measures, this section should indicate:
– The dimensions and thickness of the sheet of the material, as well as the number of strips resulting from the first cutting operation and bodies obtained in the second.
– The dimensions of the template of the flat body, with its tolerances.
– The reserves to be respected on both sides (print side and inner varnish side), necessary to carry out welding of the side seam without difficulties.
– Maximum burrs admitted in the cutting operation, also to avoid welding problems.
– The limits of location of texts, so that they are not affected by the closing of the lid and the bottom.
– Maximum permissible mismatch between the 1st and 2nd cutting operation, so as not to cause problems in the formation of the cylinder (disparity in the welding, conicity …)
Figure No. 2: Product data sheet, data for the cutting operation.
In drawing # 2 all these data are collected for the case we are considering, ie for the package RO 73 x 110
WELDING AND REBARNIZING SIDE SEWING
In this double operation, you can indicate:
-For the operation of welding the union or side seam of the body cylinder:
- The amount of overlap of the edges of material, which must be kept uniform throughout the entire weld.
- The measure of the diameter of the tube, which will be the same at both ends.
- The maximum value of disparity, or step in the ends of the welding.
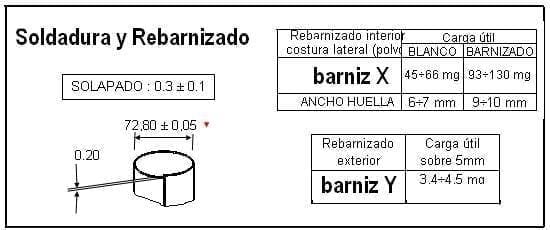
The drawing # 3, in its left part, shows these values for the case of the container of ½ Kg.
Figure No. 3: Product data sheet, data for welding and rebarning operations
The rebarnizado of the stitching realizes by both faces, therefore it is necessary to indicate the values of the useful load of varnish for the two cases. The interior varnish is usually of the white powder type and its footprint is wider if the body is varnished on the inside, so both are superimposed on their edges, and the covering of the previous reservation is ensured. The data shown in Figure 3 take into account these two options and give the varnish weight of this type for a ½ Kg format pack.
The varnish applied on the outside of the weld, is colorless liquid, the indicated value of load on a strip of 5 mm in width, centered on the welding is an indicative data.
Although it is not reflected here, it could also be indicated in the sheet, the temperatures to which the different areas of the oven must be adjusted, provided that it has elements of control and regulation of these parameters.
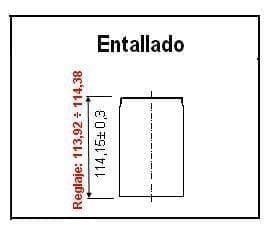
ENTALLADO
The monitoring of this operation is very simple, since normally the tooling of the machine does not allow regulation, it is only possible to act on the height to be obtained from the notched container. See figure nº 4. Likewise, it must be verified that in this operation no wrinkles or wrinkles are produced in the reduced area.
Figure No. 4: Product data sheet, data for notching control
TAB
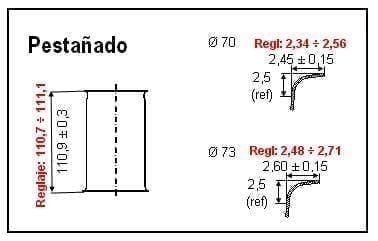
Also in the flange is the height of the body of the container the dimension to control, in addition to the lengths of tabs at both ends. It can happen that this flange length is different at each end, since they are a function of the type of closure used in each case, the closure being in turn linked to the design of the wing of the lid and bottom of the container. See figure nº 5.
Figure nº 5: Product data sheet, data of flanged
In the drawing an example is presented in which the closure of the bottom – diameter 70 – differs from that of the easy opening cover in diameter 73, and therefore the lengths of the flange, measured at the reference point – 2.5 mm -, They are different.
ACORDONADO
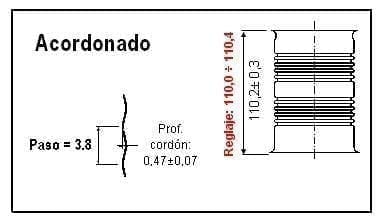
In the operation of cordoning – or embroidering – of the body, there are two dimensions to control: The depth of the cord and the height of the corded body. Both interact with each other, so that the greater the depth of the cord, the greater the height of the body is reduced. See Figure 6.
Figure nº 6: Product sheet, data of cordoning
The precise measurement of the passage between cords is quite complex, a fact that is also irrelevant to verify since it is imposed by the tooling of the machine, so that its control is dispensed with. On the contrary, it is very important to follow the depth of the cords, it depends on the values that will be obtained from axial and radial resistances. The cords must have the specified depth, and also keep the same uniform in all of them to ensure good results.
CLOSING
The task of verifying in detail a closure is not production work, for the dedication that it requires, but it must be within the reach of this Department the fundamental data of the same to confirm that they are met during the setting of the seamer and the manufacture of the container .
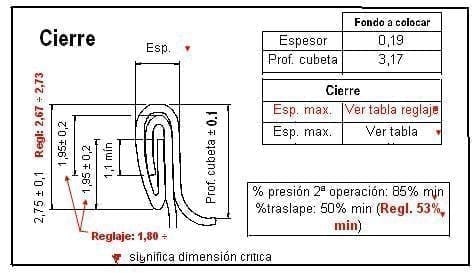
Therefore, the product data sheet should not include all the data of a closure, but those that can be checked with a simple cut and projection of the same, complemented with a small calculation.
Therefore, the data that should be collected in this part of the file are:
– Bottom to close : The thickness of its material and depth of bucket.
– Closing finished :
- Thickness (You can have tables that will give us their value depending on the thickness of the material of the bottom and the body)
- Height
- Depth of bucket
– Cut and projected closure :
- Bottom hook length
- Length of the body hook
- Overlap (or overlap)
- Percentage of wrinkles in bottom hook (or% of pressure in 2nd operation)
In the drawing no. 7 the values of these concepts are presented.
Figure nº 7: Product data sheet, basic data of the closing
As in the previous steps, adjustment and manufacturing values are indicated, and which are critical measures.
For a deeper knowledge of the concepts to control in a closing it is advisable to see the following works already published on the Web:
FINISHED CONTAINER
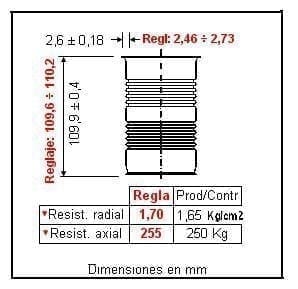
After the manufacturing process, it must be verified that the container meets the mechanical conditions necessary to meet the needs of the customer, these can be summarized in the following parameters:
– Capacity: The boat must have the expected volume, this depends on its diameter and height. For this, it is enough to check the height of the same after the bottom is closed, since its diameter has been verified beforehand.
– Closure of the client : The future closure is a function of the wing of the lid and the container flange. Therefore it is necessary to check the latter.
– Resistance : In its two modalities, radial – resistance to “sucking” – and axial – resistance to compression. Both must be verified with the proper equipment.
The values of adjustment and during the production of these factors are reflected in figure 8
Finished container
Figure nº 8: Product data sheet, data on finished packaging
PACKAGING
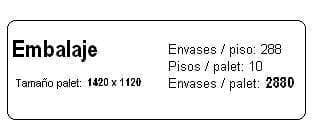
Finally, in the product file must appear in the number of containers per unit of packaging, necessary to adjust the equipment: Palletizer, packer … Table 8 shows as an example the number of containers per floor and number of floors, in the case to use a wooden pallet of dimensions 1120 x 1420, for containers of ½ Kg.
Table nº 9: Data for packaging of the package RO 73 x 110
COMMENTS
Do not confuse the operations indicated in the product sheet with the parameters to be controlled by the Quality Control Department. The product file is addressed to the Production staff and summarizing what has already been indicated is intended to:
– 1º. – Facilitate the mechanics the information about the product, necessary to make the adjustment of the equipment.
– 2º.- Always have the line operators at hand, the values that the product must meet in production.
The frequency with which these values of point 2 must be verified will depend on what is previously established, but in any case it will depend on the available time of the operators. This function fits within what we can call “self-control”. It does not completely eliminate the function of the Quality control department, but they complement each other. With the “self-control”, in the manufacture of containers can substantially reduce the tasks to be performed by Quality Control and therefore reduce the labor dedicated to it.
It is demonstrated that the “self-control” stimulates the Production staff, because it allows them to assume the responsibility of the quality of the product that they manufacture, achieving with it more demanding levels of quality. To completely separate the quality control of production, usually means that the production personnel dissociates from the quality of what they manufacture, worrying only about the quantity, reaching the extreme of trying to hide defects and failures so that the Quality Control Department do not expose them. Do not forget that quality is “manufactured” at the same time as the packaging, is not an added factor later.
In the packaging factories where “self-control” is practiced, the work of the Quality Control Department will focus exclusively on the verification of the parameters that require a certain dedication in time, such as the scrapping of a closure and its complete measurement , or the use of a complex equipment that due to its handling or value is not advisable to have one in each line, such as a durometer or the equipment for determining the porosity of a varnish.
As a conclusion, the ideal is to make an exact definition of the controls to be carried out and classify them into two groups: 1º those that can be assumed, totally or partially, by “self-control” by the production staff and 2º those that must be carried out by specialized personnel, that is, by Quality Control.



0 Comments