
SUMMARY
Simple description of the different steps involved in the manufacture of an easy-open lid, from the cutting of the tinplate, TFS or aluminum coil to the packaging of the lid. Article aimed at the uninitiated in the subject, as an introduction to it.
INTRODUCTION
In the metalworking and canning industries, the name easy-open lid has been given to a lid that can be opened without the use of any external element, such as a can opener or similar. For this purpose, it is equipped with an incision – through which it is torn – and a ring that allows to start the breakage and pull to extract the central panel.
To have a more complete idea of what an easy open type lid looks like, its constitution and operation, it is desirable to read the work “Easy open lid for canned food”, published in this Web. In the one we are now presenting, we will not focus any more on these aspects. The objective of the present one is to indicate to the uninitiated, the different phases of manufacture of this type of covers, and the necessary means to realize them.
Figure 2: Manufacturing sequences of an easy-open cover
Figure 2 shows a schematic diagram of these phases and their equipment, which can be listed as follows:
– Primary scroll sheet slitting of tinplate or aluminum coil (Not shown in the drawing)
– Varnishing and lithography (Not shown in the drawing)
– Secondary scroll banding of the sheets.
– Die-cutting, curling, gumming and drying of the sketches.
– Conversion of the draft into easy-opening lid with the addition of the ring.
– Protection of the incision and damaged areas of the cap by means of a varnish.
– Drying of the varnish.
– Packaging.
We will outline each of them below.
COIL SLITTING
The cutting of the coil into sheets for the manufacture of this type of covers is no different from any other type. This involves cutting the tinplate coils with zigzag blades on a coil cutting line, forming bundles suitable for the following operations. Drawing No. 3 shows the typical silhouette of a cut leaf.
Figure nº3: Shape of a sheet cut in scroll primario
The cut has this contour to make the best use of the material, adapting to the shape of the cutting disc of the lid-forming die. The coil slitting lines used have a multiple use, obtaining their maximum utility in material for round bottoms, as they achieve the greatest metal savings.
Photo nº 4: Primary scroll cutting tool
The photo above shows a primary scroll cutting die for round lids. It is a very robust tooling, guided with 4 columns, built with carbide inserts, which gives it a long life.
VARNISHING
Easy open caps require a more complete protection by means of varnishes than a normal bottom, due to the hardness of their manufacture. The formation of the rivet fixing ring, the opening incision and the formation of the central panel force impacts and deep deformations. For this reason, the varnish system for the interior is very complete, applying several layers of varnish, which can be of various types, polyester, epoxy-phenolics, organosols… For the exterior, the damage is even greater, so at the end of the process a new application of varnish will be required.
To apply them flat on the sheets, the conventional technique of roller application in a coating machine is used, followed by baking and curing in a continuous oven.
If the caps have any type of printing, the conventional procedure is used for their application. In the design of this printing, in the case of round covers, it must be taken into account that the position of the ring, on the cover panel, is random and can be covered by it, so that in the case of legal or imperative texts it will be necessary to duplicate them in opposite positions, to ensure that at least one of them can be read.
BAND CUTTING
The packs of varnished and printed sheets are fed to the first machine of the cover manufacturing line, which is a shearing machine for cutting into strips – or strips. To improve the utilization of the sheet, the cut is also zigzagged. The shape of a cut strip is as shown in Figure No. 5.
Figure nº 5: Typical belt for press feeding
Both the feeding of the sheets to the shear and the conduction of the cut strips from this machine to the press is carried out automatically by means of conveyors. In the lay-out shown in Figure 6, the location of the scroll shear is represented by the letter “a”.
This layout shows the complete installation of an easy-open closure manufacturing line, from the scroll to the packaging station.
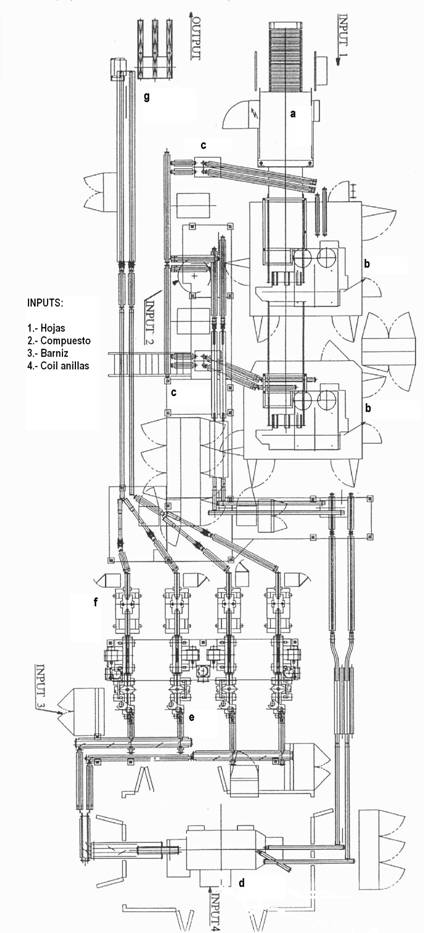
Figure nº6: Lay-out of a line for easy-opening lids
In it we can see that four inputs of raw materials are required, obtaining only one output, which is the finished and packaged caps. The complexity of the installation and its high degree of automation can be appreciated. For this purpose, a network of conveyor belts, controlled by programmable logic controllers, is used between machines. Conveyor connections between machines serve the dual purpose of automatically linking machines and creating lungs that stabilize production and reduce the number of stoppages.
DIE-CUTTING AND GUMMING OF THE SHELL
The strips are stacked on top of the press magazine, which will die-cut a first approximation of the shape of the cover – called a draft. In the previous lay-out, the letter “b” indicates the position of this press, which in this case is two, necessary to match its speed to the next multi-station press, which has a double cadence. These presses are equipped with a double punch tool that cuts the outline.
The sketch is in the form of a background with a flat central panel. At the rear of the press is the double curling machine, which turns the flange of the press to make it easier to handle in stacks without the two curlers fitting into each other.
By means of conveyor belts, which at the same time act as accumulators, the blanks are transferred to the gumming machines that deposit the compound on the flange, to ensure a hermetic seal of the lid on the container. Letter ” c” in the lay-out. In the case of using water-based compounds, the sketches must be passed through drying ovens to eliminate the water and facilitate the polymerization of the synthetic rubber.
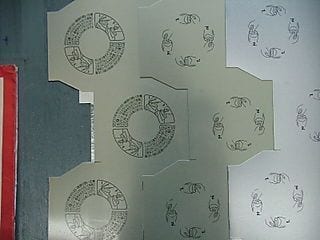
Figure 7 shows the skeleton – or cutout – of the material once the sketch has been die-cut, and this sketch in the successive steps of die-cutting, crimping and gumming.
Figure nº 7: Sketch fabrication steps
When the compound used is of the water-based type, it is advisable to keep the manufactured sketches in stock for a certain period of time, so that they cool down and finish eliminating the humidity. If the compound is solvent-based, it does not require the use of an oven, since the liquid phase of the gum evaporates at room temperature and evaporates completely and quickly. In the latter case, the blanks can be fed directly from the gumming machine to the multi-station press, although the conveyor system used allows a significant accumulation of units between the two machines.
The production of sketches from strips on double punch presses is being replaced by the use of multi-punch presses that feed whole sheets. This installation allows higher speeds, but requires a higher investment.
MANUFACTURE OF THE COVER
The transformation of the sketch into a cover is carried out on a high-precision multi-station press with a certain tonnage. The sketch progresses through the different stations step by step, either linearly or on a stir plate. In the different stations, actions are carried out on the lid. Figure 8 shows an example of an e
example in 6 steps.
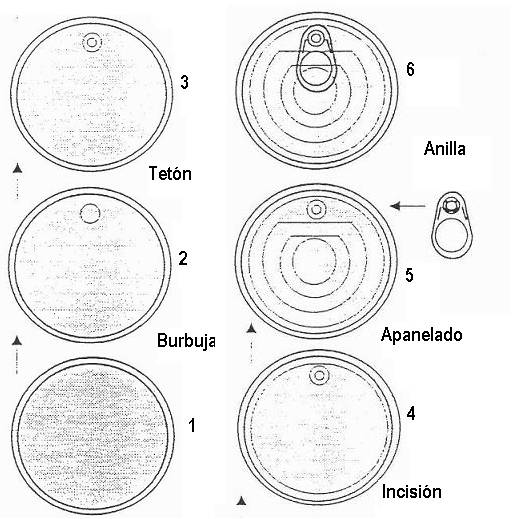
Figure No. 8: Steps in the manufacture of an easy-open lid
In the first operations, a bubble is formed, which then transforms into a smaller diameter nipple.
and vertical walls, which will then receive the ring hole and be riveted to secure the ring. In the intermediate steps, the incision for the tear and the central panel of the lid is made.
The most delicate operation is the execution of the incision, which has to have an exact depth to allow a smooth tear. If it is too little, the opening effort will be excessive, and if it is too much, there is a high risk of explosion of the lid during the process at the canner’s house. To ensure precision in the incision, the press carriage, at the end of its downward stroke, hits against very solid fixed stops, adjusted in such a way that they do not impede the rotation of the crankshaft. Photo nº 9 shows a press with these characteristics. On the layout of figure 6 this press is represented by the letter ” d”.
Photo nº 9: Press for the production of easy-open lids
The tooling for the manufacture of these covers is of high precision and high quality execution. There are different patents for covers using various versions of incision type, with different ring models.
MANUFACTURE OF THE RING
The ring is usually manufactured on the same multi-station press, from tinplate, TFS, zinc-plated material, or to
luminium of particular characteristics. The tool, with numerous stations, also has a complex design. Figure 10 shows the manufacturing sequence of an example of a widely used ring. It can be seen that it requires up to a total of 14 steps, where cutting, drawing, folding, bending and trimming actions are combined. There are three very important dimensions on the ring with very tight tolerances: the diameter of the hole that will be inserted into the cap’s lug for attachment, the distance from this hole to the nose of the ring, and the configuration of the nose of the ring. The end of the ring is designated by the nose of the ring, which will be placed over the incision to start the opening of the lid.
Figure No. 10 : Manufacturing stages of a ring
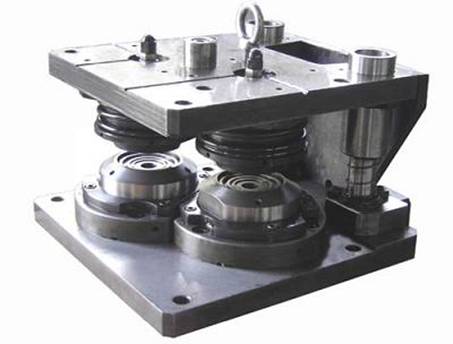
The ring die is mounted on the side of the main tool, on the multi-station press, and the rings are fed directly on the lid, without accumulation or storage of the rings. Photo 11 shows the lower part of a ring die, of a different design from the sequence presented in Figure 10.
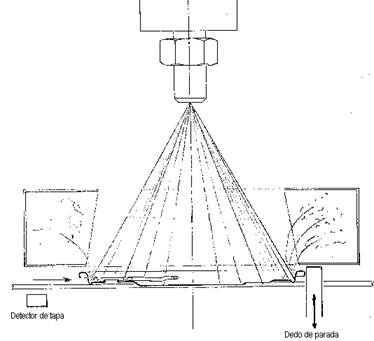
Figure No. 12: Refinishing of an easy-open lid
In the lay out of the figure nº 6, in the zone marked “e” a battery of 4 varnishing machines can be seen.
Next to the varnishing machine, well mounted on the same base and independently, there is an oven for drying and polymerization of the varnish. They are vertical furnaces, which occupy little space. The lid travels an upward and downward path, traveling a distance twice the height of the furnace, held in a horizontal position by special finger chains. In the aforementioned lay out there are also 4 furnaces in zone ” f”.
PACKAGING
Before packaging, the caps are usually checked 100% by means of an automatic optical vision inspection system, complemented by a statistical sampling of the evolution of their different parameters.
The packaging is carried out in paper or plastic bags by means of automatic equipment, which counts the pre-set number of caps and places them in the bag. Team ” g” in the lay out.
 DIE FOR ENDS
 TAPAS TWIST-OFF.- FORMATION OF CURL AND NAILS
 TOOLS FOR PLUGS Paint containers
 “U” LINE FOR RECTANGULAR ENDS
 CURLING FUNDS ON STICKER
 SPECIAL DIE FOR ENDS WITH INCORPORATED CURL
 CALCULATING THE PROFILE OF A CUT IN ZIGZAG


Dear Sir/Madam,
Hello
I hope you are doing well
On behalf of a dairy factory, I have a request to buy an easy-to-open door for packaging cheese in 16 kg tins(size 24*24)
Is your company able to provide this to us?
Thank you in advance
Dear all readers!
I am a supplier of aluminium tab stock, end stock, and galvanized steel tab stock for EZO, wish can get any inquiry from you. We will do our best to meet your all requirement.
thank you very much
Nickyro Wang
hi there
if you do not mind please send me price list of complite line of EOE with tools
machines be set for dia.99
we need price for full line easy open end making machine diameter from 55 to 99 mm price fo every machine
price for easy open line making machine size 99mm