AGGRAFATED OR GOLDEN
SUMMARY
Describe what it consists of, how it is done and with what means with manual or automatic procedure.
PREAMBLE
The present work has more value as a historical chronicle than as a technical report. The use of the locked or seam in the metrological industry is almost forgotten. It only remains as a marginal technique for some applications such as decorative packaging, but it had its period of splendor towards the middle of the 20th century. Therefore, this document is intended for those who want to know better how packaging was made more than 50 years ago.
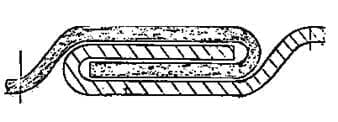
It is said that a joint between steel sheets is made by means of an engraving or engargolado, when hooks are formed at the ends to be joined by folding the metal, these hooks are in the opposite position so that they can be crossed, the latter subsequently they are linked and riveted or crushed together, resulting in a firm and lasting union. Figure 1 presents a section of an agrarian union
Figure nº 1: Section of a union by locked or seam
The way of assembling the lateral seam of the metallic packaging bodies by means of an locked or seam or engargolado goes back to the middle of the 19th century. Initially it was a totally handmade operation, making each one of the steps that we will then explain completely by hand, but soon the process began to be mechanized.
Thus initially, the flat body to be graded was curved by passing the template thereof through a roller system or reel. In 1861, Pellier in France obtained a patent for a machine – snap fastener – that was able to prepare the ends to be attached, folding them and forming hooks that once joined and tightened were welded on the outside
In the following decades, specific machines with a certain degree of complexity appeared. For example, in 1883, the Norton Brothers Company of Chicago invented a semiautomatic bodymaker, which made the stitching by gravure, with a welder of the incorporated side seam, reaching a production capacity of 40 bodies / minute. In less than a decade this equipment was improved and was already capable of exceeding 100 bodies / minute of corpses and soldiers. The firm Norton Brothers was created in 1868 in Toledo (Ohio), initially it was a vegetable canner, which manufactured its own packaging, but later only devoted to this last.
The way of sewing the container by engraving has been in force for more than 125 years, but from the decade of the “70” of the twentieth century, its use fell in a generalized way to prohibit, for health reasons, the use of tin-lead solder, as an element for fixing the braid. This meant not being able to use this type of link for food packaging. Because of this, today its use is marginal, only for non-processable cans and cans, which use a thermoplastic adhesive to achieve a certain seal.
TYPES
There are certain variants in the way of making the engraving, not only by the size of the hooks, which usually have a width between 2 to 3 mm, but by the arrangement of the same. They can be classified into three groups.
1º.-Smooth Locked or seam:
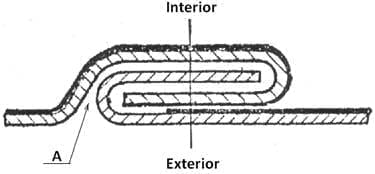
A first form is represented in figure 2, in this case the outer hook is at the same level as the external wall of the body, ie it has no relief, on the contrary the internal hook has a step at its start. This type of sewing has the following characteristics:
– Visually it is very aesthetic, because it shows a smooth surface on the outside.
– It has some danger of disengagement due to blows, since the outer hook has no stop to prevent its movement, on the contrary it does have the interior, since the step of the inner hook reduces its possibility of sliding.
– For that reason, this type of engargolado needs to be affirmed with the contribution of a welding. It is applied on the outside and is deposited in the joint groove. A tin-lead alloy is used – in variable percentage between 2 to 33% of tin – that penetrates through point A – see figure # 2 – and extends by capillarity through the interior of the agraft.
Figure nº 2: Smooth engraving
It is very little used at present, although before it was the most common because it was used for containers subjected to thermal processing, basically all preserves.
2º.- Reinforced engraving
In this type, both hooks have a step or chamfer in their beginning, with which they reinforce each other and prevent their possible disengagement to a certain degree. In figure 3 an example is represented.
Aesthetically it is less favorable than the previous type, but in completely lithographed containers it goes almost unnoticed if they are not round, and the seam is made to coincide with a corner of the boat.
Figure nº 3: Reinforced engraving
This design is used for non-welded containers, but with the addition of a thermoplastic cement to achieve its sealing. In addition to airtightness, this cement helps to keep the hooks glued together. Therefore they can not be used in preserves. If you have a wide field of application in cans for vegetable oils, minerals, fats, paints …
3º.- Reinforced engraving
It is a variety of the previous case, in which the steps are of greater height, exceeding the thickness of the engargolado. See figure nº 4. It gives a superior mechanical safety to it. It has its main application in unions without any type of sealing element, that is to say without welding or cement, and in complex forms of containers that generate more tension on the seam, such as rectangular containers of small radius corners.
Figure nº 4: Reinforced engraving
PHASES
The formation of an aggravated side seam in a metal container involves the sequence of the following operations or phases:
– A: Cutting of the sheet -material raw material – in pieces suitable for the geometric development of the body of the container plus the additional section necessary for the formation of the hooks. This addition is called “engargolado loss”, and varies depending on the width of the hooks between 5 to 10 mm.
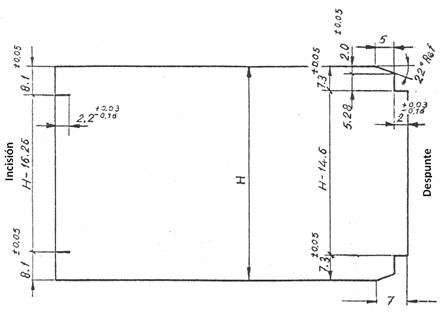
– B: Preparation of the corners . So that the ends of the seam do not have an excessive thickness that prevents a good closing of the bottom in this area, some of the material is eliminated in the corners. If the edges of the seam had four thicknesses, in the closure the hook of the bottom would be deformed and scarce, producing a leak in this area. Therefore in these points you have to remove a certain amount of sheet to get that there are only two thicknesses. This operation is called “blunt”, varying the shape and amount of material cut in the corners depending on the type of engraving to be made. Simplifying a lot there are two types of blunt:
o I .- For a smooth and welded agrafting : The appropriate blunting is indicated in figure 5. This blunting is the correct for a loss of engargolado of 6.4 mm, For other losses the design is similar but with slightly different heights.
Figure nº 5: Stub and incision for flat and welded agrafting
On the left side, no incision is made, but two incisions are made parallel to the base that give rise to overlapping areas – not engargoladas – at the ends of the seam. Later we will clarify why.
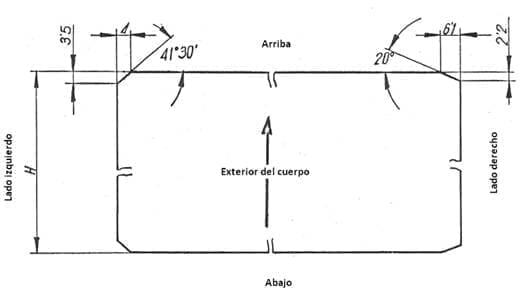
o II.- For reinforced or over reinforced agrafting, with thermoplastic cement or without anything: In this option the cutting is done in the four corners. although in a different way on each side. The drawing no. 6 presents a concrete case of this type, for a lost of engargolado of 7.6 mm
Figure no. 6: cutting edge for reinforced agrafting and cement
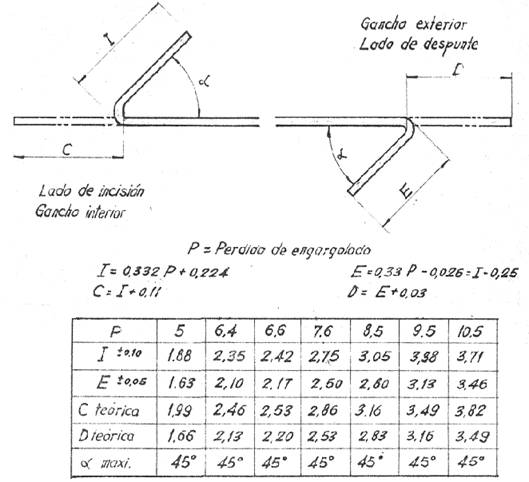
– C: Hook formation: The next step consists of forming the hooks of the locked or seam, based on folding the lateral edges of the body, with an approximate angle of 45º. In drawing no. 7, the arrangement of these hooks and their length both inside and outside according to the expected loss of agrafting are presented. The basic formulas for their determination are also given
Figure nº 7: Formation of hooks
– D: Pickling or application of thermoplastic cement: Once the hooks are formed, depending on the type of joint applied to the seam, there are 3 options:
o A. – If the seam is going to apply a tin alloy solder, strip the outer face of the inner – left hook with a suitable diluted acid
B.- Apply a molten thermoplastic cement cord to the inner vertex of the inner – left hook. If the manufacturing process used is manual, this application is made before the hooks are formed. It will be clarified later.
o C.- Leave the hooks as they are, if no type of sealing gasket is applied.
– E: Body formation: The body of the container must be given the circular, rectangular or any other shape, according to the format of the boat. This operation can be carried out at different points in the process. If it is automatic, it is done now, but if it is manual, it is done before, immediately after the trimming is done. We will return to them when we detail both processes.
– F: Realization of the hook: The body of the container is inserted in a bigornia or drum that acts as an anvil, and the hooks are crisscrossed forcing them against each other. In this position the seam is hit externally on the anvil, by means of a metal block that is called “hammer” because of the function it performs. Both the hitting surface of the hammer and the area of the inner anvil that receives the impact, has an appropriate shape in each case depending on the type of engraving we want to perform.
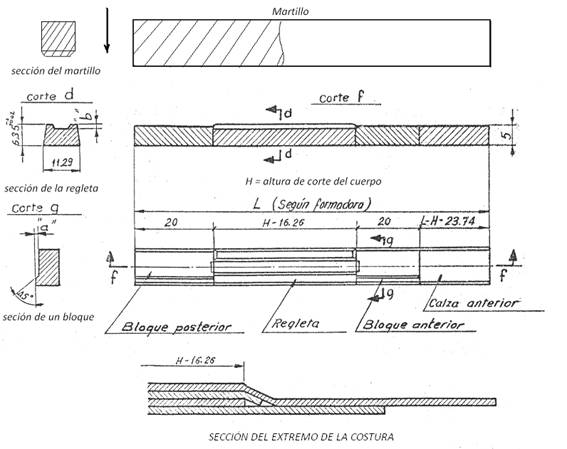
o If the engargolado is smooth , the hammer is also smooth , and the anvil has a piece with a groove that houses the locked or seam, this piece is called a strip. See figure No. 8. In this case, the blunt used is the one indicated in figure 5
Figure nº 8: Detail of strip, blocks and hammer for a smooth seam
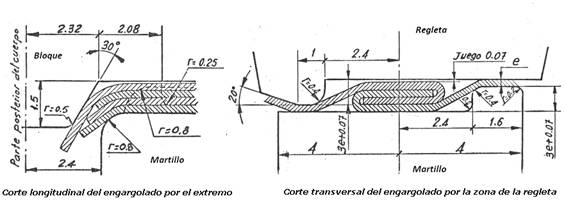
On both sides of the strip there are two special pieces called “blocks”, whose mission is to crush the seam in the areas where the trimming has been done, in it the thickness is of only two sheet thicknesses, which are also not engraved. overlapping. This ensures that in the areas that affect the closure, the container behaves as if its seam was overlapped, ie with only two thicknesses in the body hook. See figures # 8 and 9.
Figure nº 9: End of a seam with smooth and welded locked or seam
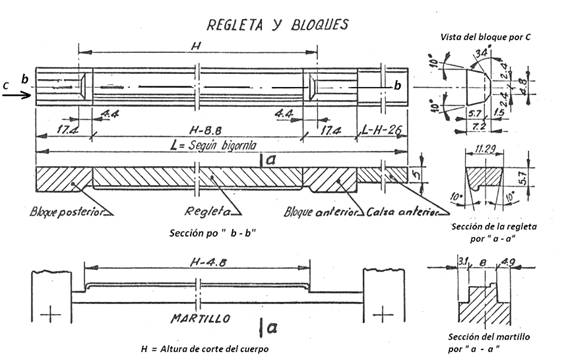
o 2: If the binding is reinforced , the shape of the hammer, strip and blocks is different from the previous case, so that when hitting on the linked hooks they produce the reinforcement steps that we have described above. In drawing no. 10, the shapes and measures that these pieces must have for a blunting of the type reflected in drawing 6 are defined. As we have already indicated, the assembly of the block and blocks is housed in the anvil.
Figure nº 10: Detail of strip, blocks and hammer for a reinforced seam
In the figure it is seen that this type of seam requires a strip with a step, to mark on the inside of the body the reinforcement step of the internal hook, and the hammer the same for the outside. The blocks have a work surface in an inclined form, so that when striking on the ends of the hammer – curved – they deform the edges of the seam in the form of a pre-taper towards the outside. See drawing of this in the left part of figure # 11.
Figure nº 11: End detail and reinforced seam center
This later will greatly facilitate the realization of the body tab. Do not forget that this seam, not being welded, does not have much resistance to internal stress, and therefore when the flange is made, if it was not already started, you could open the seam at the ends.
In figure 11, a cut of the seam in its central area appears on the right.
o 3: If the locked or seam is sobrereforzado is a case similar to the previous one with small variations in the profiles of strip, blocks and hammer
– G: Final phase: Once finished the engargolado requires some complementary operations, which depends on the destination of the container.
o If it is a processable container , it is necessary to weld the seam externally with the tin alloy, and clean the excess solder before it solidifies.
o If it is not processable and cement has been applied inside the seam, it must be heated so that the thermoplastic cement melts and rectifies any cracks that may have occurred during the seaming process.
To carry out all these phases that we have written, we can use very simple and semi-manual means or use automatic equipment. We will describe these means below.
MANUAL PROCESS
For small and very versatile productions, a low speed manufacturing line can be prepared, between 5 to 15 containers per minute, with small manual or semi-automatic machines, so we will have an easy process. Its biggest problem is that it requires a lot of direct labor.
We will enunciate each one of the phases of realization of an locked or seam, and without entering again in its explanation, because we have already done it above, we will indicate the equipment necessary to carry out each stage and of succinct form as it works.
1 .- Cutting sheet : To cut the sheets, tin or other raw material, to the dimensions of the flat bodies, just a simple circular – or shear – manual cutter, well-known use and does not deserve more detail. See an example in photo nº 12
Figure No. 12: Manual circular cutter
Logically, you will need a pair of machines, one to cut the dimension of development and another the height of the body.
2nd.- Preparation of corners : The pruning of the four corners or the cutting of two and the incision of the other two, requires two small bench presses properly used or a small detachment. See figure nº 13
Figure nº 13: Press for crop
The tooling of each press consists of a top plate – fixed to the press carriage – that carries a pair of punches and a lower one – on the press table – with the two corresponding matrices. In each press hit several tens of bodies can be broken, depending on the thickness of the sheet and the power of the press.
3º.- Application of thermoplastic cement . If the seam is cemented, it must be applied when the body is flat, that is after the stitching. It involves placing a small bead of molten cement very close to the left lateral edge of the flat body, so that when it is folded, to form the inner hook, it stays lodged in it.
The simplest machine capable of performing this task can be a double chain conveyor with drag nails, which moves the body horizontally on some support guides, with its external face downwards. The body must also move perfectly controlled by lateral guides. At a point in the path, on one side and below the level of movement of the body, there is an electrically heated reservoir that keeps the cement fused. A small motorized wheel submerges its lower part in this tank, impregnated with cement. The top of it rubs against the body, providing a cement string linearly as the body passes by brushing the wheel at the top.
You can also resort to a thermoplastic adhesive application gun that performs similar work, manually.
4º.- Conformation of the body : If the container is going to be cylindrical, the flat bodies are passed, one by one, by a manual winding machine. It consists of a small table of support of the bodies, that at the end of it presents a pair or group of rollers of different diameter, that when turning they curve the plate. See figure 14. There are variants of this type of machine that can perform the same function.
Figure nº 14: Manual coiling or bending of bodies
If the container is going to have a rectangular or a non-round shape, a small manual bending-bender is used to bend the bodies through the points coinciding with the corners of the future container. This machine basically is a table with different stops, to be positioned against them the rear edge of the body, and thus place the area to bend on a roller, located at the end of the table and at the same level, on which a second roller acts bender displaced by means of a lever. Depending on the diameter of the first roller, the radius of the curve of the corner of the body will be obtained.
5. – Formation of the hooks: The action of folding the lateral edges of the body of the container, to form the pair of hooks that will allow to form the locked or seam, is done on a manual feeding machine, with some mechanism of certain complexity.
This machine is designated as a hook former because it only forms the hooks but does not join them.
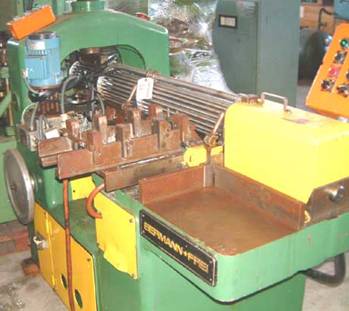
Basically it is a robust vertical support with a horizontal upper arm that hangs a crankshaft with its steering wheel. This crankshaft drives a few sheets that act on the edges of the body folding them on a bigornia. In photo no. 15 a normal model of these machines is presented, in side view.
Figure nº 15: Hook former
In photo no. 16, a detail of the drive of the planer blade on one side is seen from the crankshaft through articulated arms. Underneath the sheet, the support bracket on which said sheets act is observed.
Figure nº 16: Detail of the mechanism of a hook former
6º.- Engargolado: Once the hooks are formed, the seam of the body is deposited on the anvil of the next machine, making the link of the hooks by hand and proceeding to the riveting of the assembly. This is done on a bigornia press called an engraving machine. See figure nº 17
Figure 17: Locked or seamra (Bigornia press)
In it, moved by the crankshaft, a car carrying the hammer, hits the block and blocks, housed in the upper part of the anvil.
7º.- Seaming : For the formation of hooks and their subsequent engraving, there is a possible variant to the one described above. It is a machine that makes both operations once. It is known as the “co-glued” or “engargoladota” and is similar to a hook-forming machine, but thanks to a double effect, it performs the riveting after forming them. A model of this equipment is shown in photo # 18.
Figure nº 18: Chaser
Normally it works a smooth seam, but it can also do the reinforced one. The operation of the hook of the anvil is automatic, and the snap-in pressure can be varied slightly. In drawing no. 19, a working sequence of this machine for forming the seaming is presented.
Figure nº 19: Sequence of a seam
. This second procedure is less precise and gives a quality of locked or seam inferior to the first.
8º.- Soldier or refusion: Once the agraphing is finished, we must proceed to secure the union. As we have already commented, there may be two options.
– Seam welded with tin alloy : In this case it is necessary to heat the area of the engargolado, for example by passing the body of the container through a conveyor with a battery of gas burners. The alloy is applied directly by hand in the form of a wire or electrode on the very hot zone. Previously and on the same conveyor, the part to be welded must be stripped with dilute acid. It can be done with a brush more or less automatically.
– Cemented seam : Cement, as already explained, was applied before forming the body. Now it is only about reheating the seam, so that the cement cord, which has been enclosed inside it, is re-founded and evenly distributed inside and eliminates the possible cracks produced in the beating during the engargolado. The application of heat can be done by circulating the container by a conveyor with gas burners, similar to the previous case, but with less heat intensity.
9º.- Rest of the process: With this we have finished the sewing of the sewing, the rest of the process until the packaging is finished, we will not enter it because it is not the subject of this article.
AUTOMATIC PROCESS
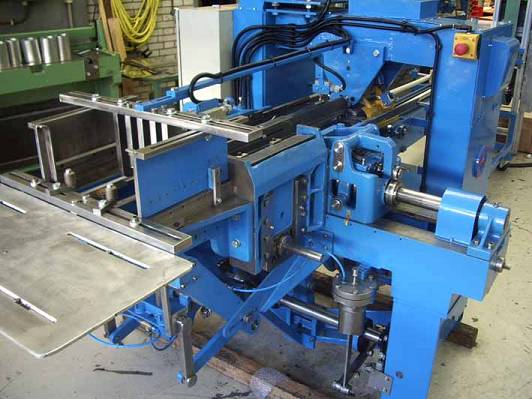
The machines that automatically perform the process of engargolado, which we have previously detailed in manual process, are called locked or seamras although they are also known under the name of “bodymakers” or machines. They are machines that are basically formed by a table – or board – very Robust, through which the container body advances phase by phase in horizontal position, always maintaining the same level. The mechanisms are operated from the bottom through camshafts, normally immersed in a bath in oil. Thus, starting from the bodies cut in the previous operation on a shear, they make a series of them of sequential operations, until completing the body of the container with its finished agrafing and its appropriate geometric shape.
In photo no. 20 you can see a side view of an automatic machine, on it the different work stations are marked with labels. At the end of the table, a strong arch serves as support for the body formation station and agraphed.
Figure nº 20: Side view of an automatic forming machine
In a bodymaker the body is moved by an alternative linear movement, made by a pair of rigid bars equipped with nails. These bars move back and forth. The successive stages that the trainer performs are:
– Separation of the bodies one by one : In the feeder of bodies the formadora goes taking each one of them from a pile. This feeder consists of:
o Side guides, which center the pile of bodies in a correct alignment on all four sides.
o At the base of these guides, scrapers of prismatic or cylindrical shape are arranged, with their rough surface or with small nails, which support the pile of cut bodies and only allow them to pass one by one to them.
o A pair of suckers, with alternative vertical movement, that suck and pull down the body that comes into contact. This suction is made by vacuum, which opens when the arm of suction cups is up in contact with the pile, and closes when they deposit the body on the horizontal advance bars
Photo No. 21 shows a top view of a simple feeder, where you can see the elements that make it up
Photo nº 21: Body feeder in a trainer
– Stub and incision: They are the same as those used in a manual process. As explained above, the edges are prepared by means of two pairs of punch-matrix. The dies are fixed on the table of the trainer, the punches go up and down mounted on supports driven from the bottom.
In photo no. 22, a top view of the blunt area in a bodymaker appears first.
Figure nº 22: Zone of incision and incision in a trainer
– Hook formation : In the next step, the hooks are folded. It is achieved by means of the movement of two pairs of plates that act on two fixed counter-amines; a couple on each side of the forming machine. On the left side, the sheet of 1º folded, in an upward movement, bends the edge of the body at 90º on the counter-sheet. Next, the second folding sheet moves horizontally from the outside inward by folding the edge over the counter-sheet at 45 °. In the drawing no. 22 these sheets appear and their movement senses are represented by arrows. The same happens on the right side, but in this case the 1st folding sheet has a downward movement. See drawing nº 23.
Figure nº 23: Sequence and way of forming hooks
Thus we have formed the two hooks with the folding in the opposite direction to be able to easily interlace them in the next automatic operation.
– Pickling or application of thermoplastic cement: Now you have to prepare the left hook to receive the sealing product. This is done in the next step, before the formation of the body. As already indicated, there may be two options:
o Soldier engraving: It is necessary to apply a stripper on the external face of the inner hook – left – so that the welding will flow well. It is done by means of a small deposit of paint strip located in this area, which drips it on a felt wheel, which rubs on the hook when it slides under it.
o Cemented agrafting: To apply the cement on the inner vertex of the left hook, an independent automatic equipment is used that consists of the following parts: A) A melting tank of the thermoplastic cement by means of electrical resistances. B) A special pump that is capable of driving the molten cement from the tank to the point of application. C) A heat-insulated and thermally insulated arm, with two lines under pressure of the pump, one going to the applicator nozzle, and another return of the excess compound to the tank. D) An applicator nozzle that injects the cement at the appropriate point. E) A system for detecting the passage of the body, which opens and closes the applicator nozzle, so that only cement passes under pressure during the time interval of passage of the body hook before it. These teams are very specialized.
– Body conformation. It is made on a drum, called a bigornia, to give it the approximate shape of the container. The body that until now had remained flat, except for the hooks on its edges, has to take the proper shape of the container. For this two approximately symmetrical pieces, located above the body and housed in the arch of the formator, move like the wings of a bird, forcing the body to wrap the anvil and take its form. Photo nº 24. shows the back or exit of the arch of a trainer with the two wings – in yellow – half-closed on the anvil; In this case, it is about forming a round container body.
Figure nº 24: Back of a trainer
To facilitate this operation, the anvil is divided into two parts in the form of half cylinders. One of them is fixed – fixed shell – and the other mobile – mobile shell -, opening and closing on the first. When the mobile shell is closed, the resulting development of the cylinder formed between the two parts is less than that of the container. This allows the hooks of the body to cross each other. When the mobile shell separates from the fixed one, or expands, its joint development coincides with that of the container and the hooks are linked, keeping the body of the container enveloping the anvil. The movement of opening and closing of the bigornia – mobile shell – is achieved by means of the displacement of inclined planes internal to it, driven by a finger, which rises and falls, fixed to the lower hammer.
This manufacturing process allows to obtain containers in a non-cylindrical way. To this end, the anvil is given the proper shape, on which the body conformed when riveting its hooks
– Locked or seam : United the two hooks just need to rivet this union to make it firm and permanent. This is done by striking the seam by means of the hammer, located below the anvil, and equipped with an upward-downward reciprocating movement. This action has already been explained above. In photo # 25 this part of the trainer is seen in two positions, on the entrance part of the body – anterior – and on that of its exit – posterior -.
Figure n ° 25: Anterior and posterior view of the section for shaping the body and engraving it.
Soldier or refusion: As in the manual process, once finished the locked or seam it is necessary to secure the union with one of the two already known options
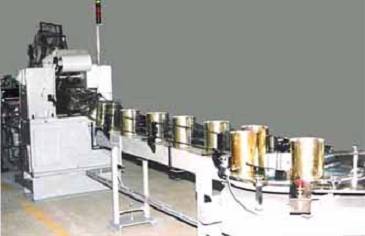
– Seam welded with tin alloy: For this , a specific and independent machine is required, although synchronized with the former, known as a welder. We will not go into the detail of it, we will only say that it consists of: A) A heating zone of the sewing area. B) A tank with a molten alloy bath. C) A rotating roller, whose axis is parallel to the seam of the container, with a special stepped profile, with its lower part submerged in the bath and the upper part aligned with the stitched seam. D) A system of transport of the body of the container by chain with tweezers. When the container is passed over the roller, the alloy seam is impregnated. E) A system for cleaning the seam of the remaining alloy, by means of rotating brushes. Photo no. 26 shows a general view of an assembled formator and welder.
Photo nº 26: General view of a forming-welding machine
– Cemented sewing : An analogous means is applied to those explained for the manual process.
At this point the preparation of the engargolado ends. The speeds of manufacture of some equipment that were in operation were really high, reaching more than 500 containers / minute, being its mechanics of great precision.
The rest of operations are executed in the machines that make up the manufacturing line.









0 Comments