INTRODUCTION DIMENSIONAL CONTROL OF THREE PIECES TYPE PACKAGING
We have already discussed in other works, different aspects of a quality control system, either from the point of view of carrying out certain tests, or from the definition of defects, sampling plan, quality levels, etc. It has also been developed for concrete materials – ends – the same material that will be discussed here. So we could refer to the following works:
– “Reception of cans in a filling plant”
– “Dimensional control of ends”
– “Mechanical properties of the cans”
Now we will focus on how to control the most important parameters of “three pieces” type cans, once they are finished. We will not enter into the control of your ends, which has already been studied in “dimensional control of ends”, or in the verification of seam that is developed in the works:
– “Seaming control”
– “Specifications of beverage can seam”
– “Seaming measures”
At present, there are very sophisticated means of control, which allow to measure the main dimensions of a can in an almost automatic way. Due to the high cost of these equipment, they are only justified when the volume of activity is large. This means that for small companies, their acquisition does not make much sense. The procedures that are explained here, use simple and economic instruments and are designed for this last type of companies.
The tests and instruments that are detailed, are designed to do for example the control of reception of cans in a canning, although what is described here, is even valid to mount directly a control in the workshop of a metal manufacturing.
PARAMETERS TO BE CONTROLLED DIMENSIONAL CONTROL OF THREE PIECES TYPE PACKAGING
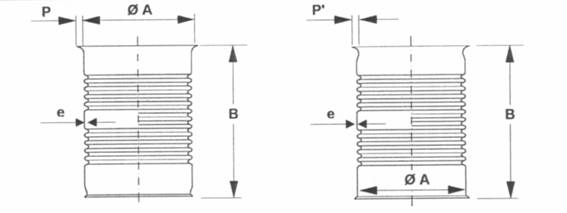
We will break down what are the basic measures of a can that must be controlled. For this we will rely on the figure # 1
Figure 1
The following table summarizes: a) the dimensions to be taken – marked with the same letter as in Figure 1, b) the concept that they reflect and c) the normal tolerance applied in these measures.
|
COTAS
|
CONCEPT |
TOLERANCES
|
| e
– A B P – – – –
|
Tin plate thickness
Tinplate hardness Inside diameter Actual can height Tab width Minimum axial resistance Minimum axial resistance Capacity Water tightness
|
According to norms “ “ + 0.05 + 0.40 + 0.20 – – According to norms See test
|
For the thickness, tempering of tinplate and capacity of the can, we refer to the international standards in force. The axial and radial resistances depend on the size of the can, as well as the tightness test pressure, therefore they can not be simplified in a single frame. They will be commented on in the specific description of each test.
There are other parameters that can be measured, but not included in this work because they are more complicated or can be followed in articles already published on the Web, such as:
– a.- tinplate tin. See: ” Determination of Tin Coating in Tinplate” in the “Technical Information” section.
– b.- Load of interior and exterior varnish. See: “Determination of the dry film weight of varnish“.
– c.- Seaming the bottom and lid. We refer to the works indicated in the introduction.
– d.- Cordons – number, step between them, profile -. In the end, the important thing is the value of the radial resistance of the can that the cords generate. Therefore, we will not enter the analysis of the cords, but of the radial resistance.
Consider then that we already have a complete table with the values of the parameters to be controlled. It can be made as indicated above, adding the amounts of each dimension in the column of tolerances. With it in front we can start the control
THICKNESS DIMENSIONAL CONTROL OF THREE PIECES TYPE PACKAGING
- Purpose : To ensure that the can body has adequate mechanical strength.
- Measurement instrument : Micrometer with thin or semi-spherical tips, preferably digital.
- Method : Direct reading
HARDNESS DIMENSIONAL CONTROL OF THREE PIECES TYPE PACKAGING
- Purpose : To ensure that the can body has adequate mechanical strength
- Measuring equipment : Hardness tester equipped with Rockwell HR 15T and HR 30T scales.
- Method : See the equipment manual in each case.
If the tinplate is of the reduced double type, the use of the durometer is not reliable. We must resort to other more complex means.
INTERIOR DIAMETER “A”
Purpose: To ensure
– a .- The capacity of the can
– b.- The correct adjustment of the lid
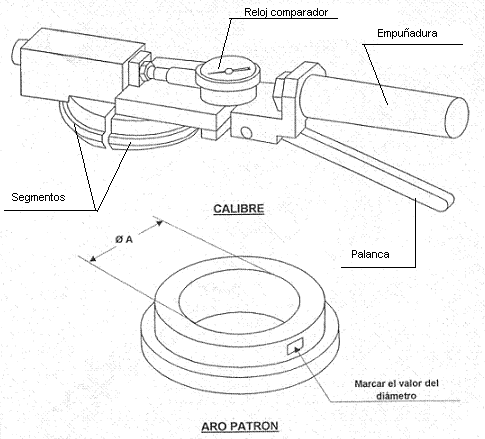
Measurement instrument: Caliber in the form of a clamp with comparator and standard ring according to figure 2. It can be manufactured or acquired in the market. The pattern ring must have an internal diameter coinciding with that of the can.
The caliber consists of two pieces – or segments – semicircular, whose outer diameter is the same as the inside of the can. One segment is mounted in a fixed position on the support, and the other moves slightly towards the center when the lever is pressed. This reduces the diameter of the gauge, facilitating its introduction into the body of the boat. The comparator watch detects the displacement of the mobile segment.
Figure 2
Diameter A = Internal diameter of the can + 0.01 mm.
Method:
- Zero setting: Close the gauge segments (with the lower lever) and insert them in the standard ring until the bottom. Open the segments gently, releasing the lever. Put the dial of the dial indicator to zero. Extract the gauge by retracting the segments.
- Measure the internal diameter of the body: Close the segments and insert them inside the body to be measured, until they penetrate thoroughly. The can must be in an upright position. Release the lever gently so that they expand. The welding must be placed in the recess made in the fixed segment for this purpose, so it will not distort the measurement.
The difference between the inner diameter of the body and that of the standard ring will appear on the cover. Its value will indicate whether the measure is within tolerances or not.
CAN HEIGHT “B”
Purpose: To make sure
– a .- The capacity of the can
– b.- Good operation of the filling and seaming line.
Measure instrument:
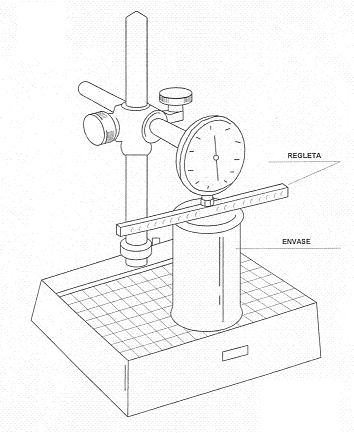
– Comparator clock with base
– Rectified strip
– Standard cove, of exactly the same height as the can to be checked
See figure nº 3.
Figure 3
Method:
– Put the comparator dial on the dial with the help of the standard cove used in place of the can.
– Change the standard scale for the can to be measured.
– Check the reading difference. Its value indicates if the height of the can is inside or outside of tolerances.
Alternative method: Direct measurement using caliper
TAB WIDTH “P”
Purpose: To have the appropriate stink to carry out the closure.
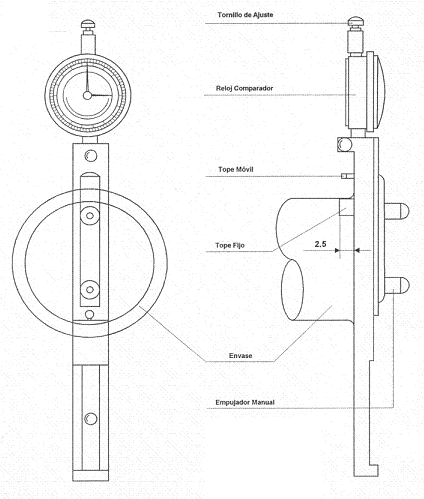
Measuring instrument: Measurement gauge of flange width according to figure No. 4. Can be obtained in the market or manufactured in the workshop. It consists of a comparator clock, mounted on a strip equipped with stops (fixed and mobile).
Figure 4
Method:
– Reset the comparator with the fixed and mobile stops in contact.
– Open the mobile stop using the pusher, place the gauge over the mouth of the can as shown in figure # 4.
– Take the direct reading of the tab width “P”, approaching the mobile stop until it contacts the edge thereof.
– Take the reading in three points at 120º and calculate the arithmetic mean of the three.
Alternative method: Direct measurement using the vernier caliper
AXIAL RESISTANCE DIMENSIONAL CONTROL OF THREE PIECES TYPE PACKAGING
Purpose: To verify that the can will support well the vertical loads of stacking in warehouses.
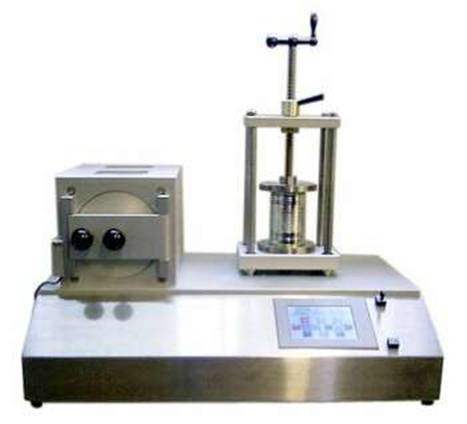
Measuring equipment: In the market there are various offers of measuring equipment for axial resistance. As an example, see the one indicated in the right part of figure No. 5. It basically consists of a system to transmit an axial effort – screw press – and a dynamometer that measures this force. It is possible to build this equipment, in a simple way, using loose components of the trade: maximum dynamometer, spindle equipped with crank, stainless tube structure, two plates – lower and upper -, the upper must be attached to the spindle by an articulated system to ensure uniform support, basis of the whole …
Figure nº 5
Method : Introduce the cans between the plates of the equipment and subject them slowly to the axial effort. Immediately stop the sinking of a cord. The reached value of the force will be its axial resistance. In the automatic equipment, when there is a slight vertical deformation of the can, the test is stopped instantaneously.
Adequate values of axial resistance
For guidance purposes, their values can be:
- For packaging with a diameter equal to or less than 73 mm: 250 Kg.
- For cans with a diameter of 99 mm: 450 “
- For cans with a diameter of 153 mm: 650 “
RADIAL RESISTANCE DIMENSIONAL CONTROL OF THREE PIECES TYPE PACKAGING
Purpose: To verify that the boat will behave properly when subjected to pressure differences – external and internal – important. This is frequent during its industrial process. When these pressures exceed their radial resistance the can collapses.
Measuring equipment: The market offers adequate equipment to control the radial resistance. It is often possible to acquire equipment that has two different stations to measure both resistances (axial and radial), as shown in figure 5. The camera on the left is the hermetically sealed compartment where the can is subjected to the test . It is easy to make a team “homemade”, with a large pressure cooker – which is capable of containing several cans -, a maximum pressure gauge coupled to its lid and an entrance to the compressed air pot equipped with a quick stop .
Method: The operating principle for the measurement of the radial resistance consists in introducing the can, closed at both ends, in a hermetic chamber and subjecting it progressively to external pressure until a permanent – suction – deformation occurs. It is easily detected because the external pressure at that moment suffers a slight decrease when increasing the outer space, it is accompanied by a loud “crash” caused by the collapse of the walls of the can. In the automatic equipment of the market, the process is automatically stopped. In the “home”, you have to be aware of the noise and cut the air immediately.
The radial resistance is measured in Kgrs / cm2. A value accepted as good is at least 1.7 Kg / cm2 for cans with a diameter of 99 mm. or minors. This value decreases for larger diameter cans, reducing to below 1 Kgrs / cm2 for 5 Kgrs. (diameter 153)
CAPACITY DIMENSIONAL CONTROL OF THREE PIECES TYPE PACKAGING
Purpose : To ensure that the can can receive the intended content.
Measuring equipment and method : According to UNE EN 20090-1 for Spain
SEALING DIMENSIONAL CONTROL OF THREE PIECES TYPE PACKAGING
Purpose: Confirm the tightness of the can.
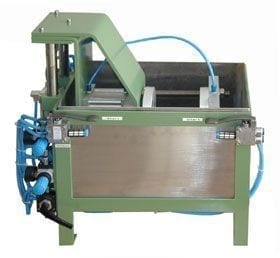
Measuring equipment: leak tester. It basically consists of a water tank, in which the can is submerged and inside it is subjected to internal pressure by means of compressed air.
There is a wide variety of water testers in the market, adapted to different packaging formats, number of them, etc. Figure 6 shows a single head, ie to test the tightness of a single can per cycle.
Figure nº 6
It is not difficult to prepare one in the workshop based on:
– Stainless steel tank
– Tilting set with various packaging supports
– Movable heads, mounted on the tilting assembly, which hermetically seal the mouth of the cans with rubber gaskets, equipped with air injection nozzles.
– Pneumatic air supply circuit, with valve controlled by cam. It acts when introducing the basculante set in the water.
Method:
Positioning the cans on the supports, they approach the heads that plug the mouth of the same. The bascua set, submerging in the water bath. The valve allows the passage of compressed air. If the can leaks, air bubbles will be seen in the water.
The cans must be totally watertight under a test pressure of 1.5 Kg / cm2. For diameter formats 153 and larger, both round and otherwise, this value will be the maximum applicable without permanent deformation occurring in the lid / bottom tray. This pressure is usually less than 1 Kg / cm2.







0 Comments