Introduction
Die marks are a common defect that can occur during the manufacturing process of metal cans, specifically when using tool packs in the 2-piece can-making industry. These defects can negatively impact the overall quality and appearance of the finished product. In this article, we will discuss the causes of die marks, their impact on the can-making process, and how to prevent and address them using the latest innovations in tool pack technology.
Causes of die marks
Die marks occur when the dies within the tool pack come into contact with the thin wall portion of the can, causing visible marks or ribbing on the surface. This can happen due to several reasons, including excessive vibration from the ram, improper die movement within the die modules, or vacuum formation between the die and the surface behind it.
Impact of die marks
Die marks not only affect the appearance of the cans but can also compromise their structural integrity. This may lead to customer dissatisfaction and increased production costs due to the need for additional quality control measures and potential product recalls.
Preventing die marks with modern toolpack technology
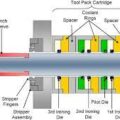
One of the key innovations in tool pack technology that helps prevent die marks is the use of rubber springs and contoured pins custom-ground to the can maker’s die size. The rubber springs help dampen vibrations coming from the ram as it passes through the tool pack. This absorption of vibration reduces the chances of die marks occurring on the thin wall portion of the can, resulting in better, brighter cans.
Another essential feature to prevent die marks is the air blow-off system. After the ironing dies float to the center of the advancing punch/can, they are pressed against the surface of the module or spacer behind the die. This pressure creates a vacuum between the die and the surface behind it, which can hinder the proper movement of the die. An air blow-off system is required to break this vacuum, allowing the springs and suspension pins to return the die to its center position. The surface behind the die must be equipped with air grooves that are charged from the lid, in the same method as coolant.
Addressing Die Marks and Maintaining Tool Packs
Regular inspection and maintenance of the tool pack components are crucial to prevent die marks and ensure smooth operation. Follow these steps to address die marks and maintain your tool packs:
Inspect the tool pack parts for burrs, nicks, dents, and other damages. Smooth out any raised damage using a stone.
Remove the die(s) and inspect the internal area of the tool pack where the die(s) were removed. Stone and clean up any rough or damaged surfaces inside the tool pack modules.
Blow out the module to get the tool pack free of dirt, fines, and other contamination.
Check the new die to make sure the OD and faces are free of nicks, dents, burrs, or any other rough surface conditions. Repair or replace dies that are not in good condition.
Ensure that the die fits correctly into the module and can move off-center (float) when the cover plates are installed.
Conclusion
Die marks are a common defect in the can-making industry, but with proper understanding and implementation of modern tool pack technology, they can be effectively prevented and addressed. Regular inspection and maintenance of the tool packs, combined with the use of rubber springs, contoured pins, and air blow-off systems, can significantly reduce the occurrence of die marks and improve the overall quality of the finished cans.


