INTRODUCTION
The reduced double tinplate has a high rigidity, characterized by a hardness measured on the Rockwell 30T scale between 70 to 80 degrees. This measurement can be made on a Rockwell 15T equipment for thicknesses less than 0.20 mm and later converted into Rockwell 30T scale values. Its breaking load is of the order of 60 Kgr / mm2.
However, a tinplate of the reduced double type is not advisable to measure its hardness by means of a durometer. The reason is the thinness of these types of sheet, this makes the penetration ball of 1/16 “, when nailing on the metal also deformed, distorting the reading.
Therefore, in this case it is better to measure its elastic limit and compare it with the nominal one, a fact that the steel industry facilitates as an identifying element. This test, slow execution, requires complex equipment and high price, so it is difficult to do it continuously in each coil, during the manufacturing process.
It is worth remembering before focusing on the issue of the determination of this elastic limit, that to identify this tinplate, the European designation code consists of the letters “DR” (double reduced) and a figure of three digits, which coincide with the value of the elastic limit thereof expressed in N / mm2. The American code uses the same letters “DR” followed by a digit, corresponding to the first figure of the value of its elastic limit expressed in psi. An approximate hardness value can be given on the Rockwell HR 30T scale, but can not be taken as a reliable data. For the reduced double the following table of values can be given:
Europe America
Code Elastic Limit Code Hardness approx. HR 30T
DR520 520 N7mm2 DR 7 (70,000psi) 70
DR550 550 N / mm2 DR 8 (80,000psi) 73
DR620 620 N / mm2 DR 9 (90,000psi) 76
DR660 655 N / mm2 DR 9M (95,000psi) º 77
DR690 690 N / mm2 DR 10 (100,000psi) 80
INDIRECT DETERMINATION OF THE ELASTIC LIMIT
Given the complexity of determining the elastic limit in the production workshop, it can be replaced by another simpler test, using a simple tool that checks the elasticity of a specimen of well-defined dimensions.
Although with little depth, we have already touched on this topic in the published works:
– Quality control in coil cutting lines
– Properties of the base steel
Now we will discuss it in more detail
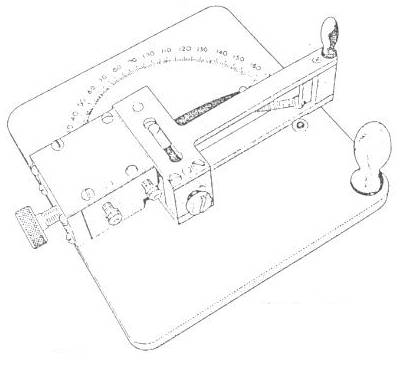
This test is based on the principle of measuring the permanent deformation caused in the metal after subjecting it to a bending stress. To do this, an instrument is used to perform this bending and measure its value. This gauge is a portable device, which can be installed on any workbench. It is known under the name “Spring back temper tester”, which could be translated as “Elasticity hardness tester”, Figure 1 presents a gauge of this type.
Figure No. 1: Spring back temper tester
Realization of the determination:
Objective of the test :
Check the degree of hardness of a reduced double tinplate through the elasticity of the material
Description:
The “temper” test is done with an instrument that allows to bend a metal sample. This sample – or specimen – is of fixed dimensions, and it must be taken from the coil or sheet of tin to be studied. If it is a coil we can take several samples at different points of the same.
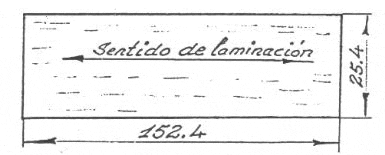
It is necessary to have a shear that produces metal specimens for the burr-free test. A specimen that presents burrs distorts the value of the angle, since it gives it a greater resistance to deformation. The adequate measurements of the specimen are: Length 152.4mm, Width: 23.8mm. If a quality shear is not available, a small cutting die mounted on a low power press can be used.
It must be taken into account that always the largest side of the sample has to go parallel to the direction of rolling of the steel, that is parallel to the direction of the grain. See figure # 2:
Figure nº 2: Test tube for “spring back temper tester”
It is necessary to do so, since when performing the test, the specimen must be bent perpendicular to the direction of the grain, otherwise the value obtained can vary 2 or 3 degrees bend angle.
Before carrying out the test, it is convenient to measure the thickness of the sample, with the help of a special micrometer, since this is a fact to be taken into account. Once prepared the sample or template is carried on the gauge and proceeds to perform the same.
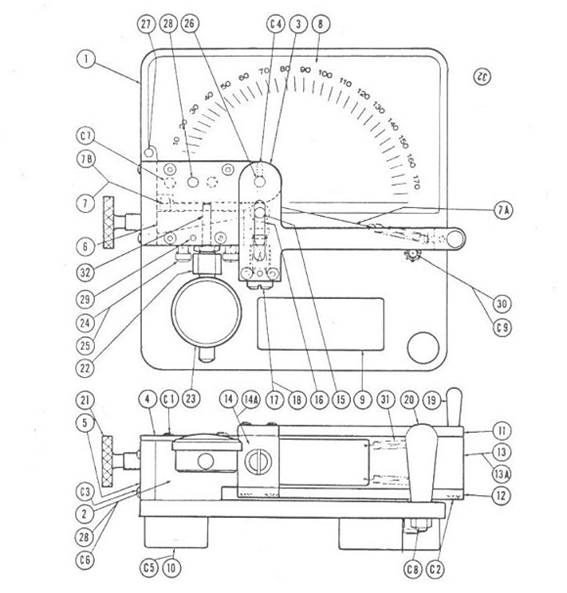
Figure 3 shows more in detail a gauge of this type, Although the principle of work is the same as that shown in Figure 1, it differs slightly in its design, and incorporates a clock-feeler that directly measures the thickness of the template (Parts 32, 22 and 23 of Figure 3). Using the numbering of the pieces of this drawing we will describe the steps to be taken:
Figure nº 3: Detail of the SBTT gauge. (Spring back temper tester)
1.- Loosen the fixing screw (21) and insert the test piece of metal to be tested, parallel to the forming arm, making sure that it makes contact with the internal stop (5). Tightening the screw.
2.- Tilt the forming arm up to 180º (11, 19) and return to the original position. In this way, the specimen is bent over a small mandrel (3) by the action of the forming arm, after which it is released by the action of springs (31). This operation must be done quickly. Do not let the training arm hit the return to the original position.
3.- The test piece will be curved by its central part. Its free end, in straight form, will mark an angular value on the scale (8). The residual angle of the deformed specimen on the scale (8) is then measured. Record the reading and remove the specimen sample
4.- The value of this angle, together with the thickness of the sample, is carried on tables that determine the elastic limit in a fairly approximate way. These tables are supplied with the equipment
An empirical value of 4.- The value of this angle, together with the thickness of the sample, is carried on tables that determine the elastic limit in a fairly approximate way. These tables are supplied with the equipmentthe elasticity – or rather the permanent deformation of the material, related to the creep of the same – of the steel base of the tinplate has been evaluated, but it is directly linked with its hardness. The pattern board is made in such a way that it links permanent deformation with hardness, and knowing the flow angle of the one, the value of the other is known.
There are commercial teams in the market that allow their realization.








0 Comments