In the “70s” of the last century, when the new welding technique of the lateral seam of the “three pieces” metal containers began, the “black beast” of the quality of this union was the appearance of “Commas” in it. The danger of this failure was accentuated as the welding speed increased. It took years of experience and research to develop sufficient means to control this defect, although the risk of always being present is latent.
But what are the “commas”? We will try to explain it succinctly, since it is not in this work to develop the theory on which the electric welding applied in the seam of the cans is based.
The passage of the electric current, through the area of overlap of the joining edges of the body of the can, results in localized heating in the form of dots that produces the fusion of the metal belonging to both edges.
These points really take the form of an elongated “lentil” or “lentil”, which, when heated until the fusion, expands due to the action of heat.
The pressure of the upper (or outer) welding roll must be such as to neutralize the expansion stress of the molten metal. If this pressure is weak, the molten metal escapes, towards the outside of the weld, in the form of projections or expulsions. This is a reason for major defects in the welding, since when the metal cools, the part of it that has been ejected out of the weld will be missing inside, resulting in small gaps in it.
To better understand this phenomenon, let’s take a closer look at the thermal state generated inside a point produced by the welding current. See figure A: “Welding point”
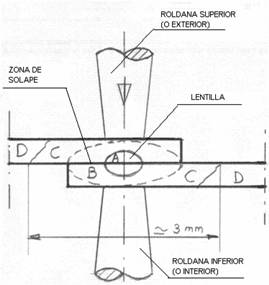
Welding point
At this point you can differentiate the following areas:
– Zone A: It is the nucleus of the point, it is located at the intersection of the vertical – marking the direction of passage of the electric current – with the horizontal – contact area of the edges of the body -. In this area the metal melts reaching temperatures of around 1500 º C.
– Zone B: Envelopes the previous one. In it the metal is in a pasty state at a temperature of approximately 1000º C.
-Zone C: Positioned where the overlap of the edges begins. Hot.
-Zone D: Part of the body contiguous to the overlap. It is at room temperature.
Therefore, the temperature gradient rises from ambient to 1500 ° C at a distance of less than 3 mm.
Interruption of a welding current – once a point – marks the beginning of cooling of the “lens”, with sudden temperature drop.
We thus enter the cooling phase. The “lens” made of molten metal is inside an important refrigerating mass consisting of:
– The welded pieces (container body)
– The electrodes The weld rolls that are refrigerated.
This causes rapid thermal changes, causing a crystallization converging towards the center of the point:
– Zone D = No change of structure.
– Zone C = Decrease in grain size
– Zones B and A = smaller crystals appear.
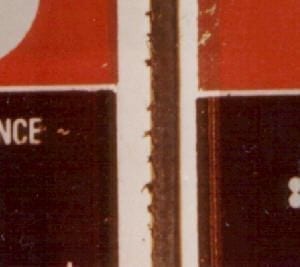
It is the critical moment of welding. In the case that the refrigeration under pressure is not carried out correctly, welding defects such as the appearance of external projections or expulsions – see below photo – and above all internal “blowholes” that by their configuration are called “commas”, having the curved shape of this orthographic sign. These projections are exits towards the outside of the molten metal of zone A and are located on the step of the overlap. The “commas” are located in the center of the weld, zone A and are metal plugs when cooled, either due to lack of it – due to projections – or because of a faulty solidification due to incorrect cooling.
Expulsions in a weld
The appearance of “commas” is very dangerous because it is a pore inside the weld, where there is a high risk of leakage. They are not visible therefore, being a defect that almost always goes unnoticed. It requires a test of some complexity and also requires certain laboratory material to make them manifest. We went on to detail this test:
Purpose of the test
Detect serious accidents of electric welding, not revealed by the classic mechanical tests, as they are specifically “commas”.
Preparation of the sample
1.-Starting from a body of a can already welded, isolate the seam by doing two cuts along the tube, to 15 mm. on both sides of the seam.
2.-Remove, except for a particular case, the upper and lower parts of the seam (8 mm from the edges).
3.-Cut, perpendicularly to the seam, samples of 3 mm. wide, at the entrance, half and exit of the tube.
4.-Straighten them, and then layer their ends towards the inside face.
5.-Make a longitudinal cut of approx. 2 to 3 cm. according to the mold, and 3 mm. of width. Layer it in the same way as the cross sections. Cut flush with the weld seam on the inside. A polishing on sandpaper 120 will allow to reach the center of the overlap.
(The longitudinal cut is a little more delicate than the cross section, however, it is preferable for the search for “commas”).
Used material
Scissors for cutting tinplate and pliers.
-Bleeding bench and abrasive papers grade 120, 400, 1200 (or 600). -Support (marble).
-Molde and release agent.
-Up to modeling and Technovit Resin or similar of two components.
-Binocular or profile projector in episcopal (x50 or x100).
Incrustation
-Choose as a support a flat, smooth and solid surface (for example: marble or 2 cm thick glass plate).
-Choose a 3 or 4 cm metal or plastic cylinder as a mold. in diameter by 2 cm. Tall.
-Lubricate the mold and the support with an aerosol type LUBORSIL (release agent) Failing that, any fat product.
– Ensure the tightness of the base of the mold surrounding it with modeling paste.
-Dispose the samples on the marble, in the center of the mold.
Preparation of the resin
-Verter and mix the two components of it in a container according to the indications given in the employment note of the product.
– Carefully pour the resin into the mold taking care not to move the samples.
-Let solidify.
Sanding
– Lay the abrasive paper strips on the support.
-Leaving water continuously during the entire sanding operation.
-In the same way, always sand in the same direction. When changing the grade of the paper, turn the sample 90º and sand until the grooves produced by the previous sanding have disappeared.
-Control the binocular (or the counting) the polishing state.
Polishing and developing
-Recover the surface of the incrustation with the reagent whose composition is given later (You can also immerse the sample in the reagent).
-Leave in contact 5 to 10 min. The reagent polishes the metal surface and reveals the crystals.
-Wash with water and then with alcohol.
-Dry off.
-Observe with the projector. If there are presence of commas, they will be clearly appreciated.
Observations
Minimum magnification: 50 increases
In case of insufficient polishing: Re-polish.
Preparation of polishing reagent
Solution A: 30% oxalic acid: 40 g.
Distilled water: 500 ml.
Mergital: 1 drop.
Solution B: 30% oxygenated water: 70 ml.
Distilled water: 500 ml.
Sulfuric acid concentration: 3 drops.
At the time of use, mix a volume of A with a volume of B. These two solutions can be stored for a few days in closed bottles.
Final comment
The examination described above, which requires some preparation, because it is slow, can only be carried out to verify special situations of doubt of the welding quality that a welder is making. Although it is laborious, it shows the attributes of the same and is very evident especially in the verification of the longitudinal cut.
Welding point monitor
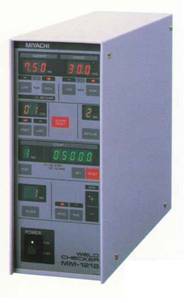
Modern welders are equipped with a control of welding points, which almost always make this verification unnecessary. However, the old machines still in use, especially if they are not equipped with this equipment, make this test very useful.
A series of improvements have been added progressively to the welding arms to minimize the risk of commas, such as:
– Prolonged Muller on the lower arm; improves thread cooling.
– Refrigerated carriers, with the same purpose.
– Inverted circuit of the thread; optimize contacts.
– Etc.





0 Comments