SUMMARY
Determination and evaluation of the porosity of the interior varnish of a can by means of a high hardness test. It describes how to control the different parts of the boat.
PRESENTATION
Porosity means the smallest points inside a can protected with varnish, which are left uncovered by it – and therefore with exposed metal – after the manufacturing process. Therefore it must be ensured that the porosity in a can is minimum. This same criterion can also be maintained by its external face, although it is less important.
The porosity of a varnish, applied inside the body or bottom / lid of a can, is a fundamental characteristic to know the suitability of the same for the protection of its content. There are various tests to evaluate it. On this website some have already been presented. Now, with this work, we expose the hardest one that is used in the market. Its hardness is such that it must be used with some prevention, as it is frequent that rejectable evaluations obtained with it, are perfectly valid. A varnish application that is acceptable with this method, you can be sure that it is of an optimum quality.
This test is known in the market, and some canners or packers intend to use it as an element for the evaluation of a coating. We present this work with the intention that this test can be questioned as a single judgment, without admitting other complementary tests. In this case, the metalworker would be seriously harmed.
POROSITY OF A VARNISHED LEAF SHEET
To determine the porosity of a sheet varnished by this procedure, you must act as follows:
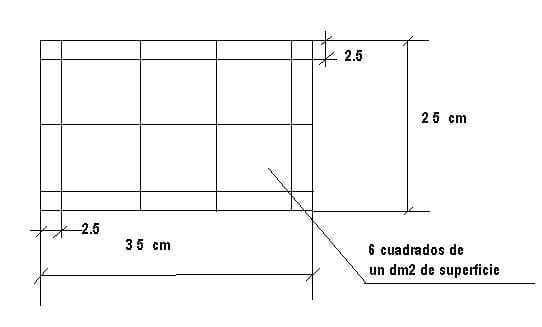
Cut as accurately as possible a strip of the sheet of dimensions 35 x 25 cms. Make cuts in the four corners to 2.5 cm and bend them and stick with PEROL glue, as indicated in drawing # 1. We will have obtained a compact can in the form of a tray, with a base of 30 x 20 cm and a height of 2.5 cm. The surface of the base will therefore be 6 dm2.
Drawing nº 1: Preparation of the sheet
Inside the same the electrolyte that we detail below is placed up to an approximate height of 0.5 cm.
– 20 grs of SO 4 Cu. 5H 2 O
– 0.1 ml. of agent mojador TEEPOL
– 1000 mls of demineralized water + a few drops of sulfuric acid (SO 4 H 2 ) until the solution has a pH = 4.5
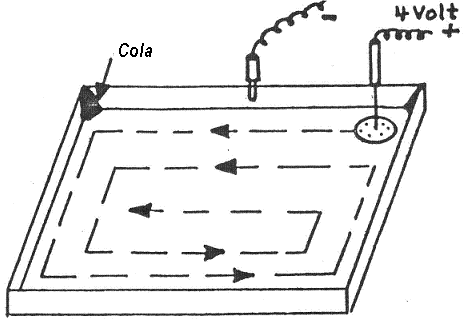
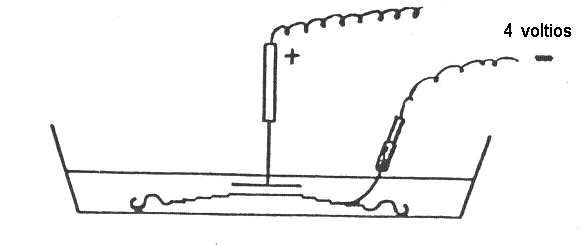
The negative pole of a 4-volt car battery is connected by means of a crocodile clip, while the platinum electrode is connected to the positive pole of the battery by an area on the edge of the tray where the varnish has been scraped. it is immersed briefly (for 20 seconds) in the liquid, making a route as indicated in figure 2. The positive electrode that moves to have a tip in the form of a flat circular surface.
Drawing No. 2: Positive electrode travel
The porosity assessment is carried out immediately, counting the number of pores and scratches in each dm2. To do this, it will help if the 6 surface squares have been previously marked on the sheet one dm2 each, as indicated in figure 1.
Evaluation of results:
0 pores = very good
1 – 5 pores = good
6 – 10 pores = pretty good
10 – 20 pores = regular
More than 20 pores = bad
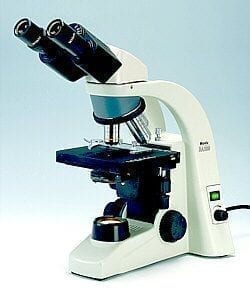
When the porosity has been determined, the pores are quickly rinsed with water, cut the piece of sheet where the pores are. We measure the pores with the help of a microscope with an enlargement of 80 (50 – 100) equipped with an eyepiece to measure. We remove the black layer of deposit on the pore with the help of a wet napkin and re-evaluate its dimension in the microscope. We can appreciate that a large pore, with the black deposit layer can have 1 mm in diameter or something else. Once removed the black layer, its real value on the sheet in the order of 40 microns.
POROSITY OF VARNISHED ENDS
This same porosity test with slight adaptations can apply to the funds or covers. To do this, proceed as follows:
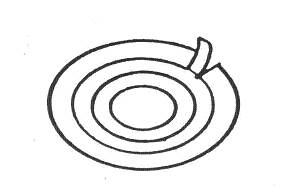
Take a loose bottom and with scissors for metal cutting, make two parallel cuts and fold as indicated in drawing # 3. If the lid is varnished on both sides, scrape the cut and folded area until the metal appears , since in this area the current will be applied.
Drawing nº 3: Preparation of the background
Place the cap inside a vessel with test electrolyte, which is the same used in the previous case, put the crocodile clip corresponding to the cathode on the piece of cap that we have cut and submerge the anode for 10 seconds at a distance of 5 mm from the lid See figure No. 4.
Drawing nº 4: Application of positive electrode on background
Depending on the size of the lid, the platinum electrode is left standing or moves in circles on the inner surface of the lid.
Evaluation of results:
Pore clusters should not be tolerated over the circles of expansion rings and bottom gradients. Otherwise the criticism is as described above in the case of a sheet.
In doubtful cases, sterilization tests should be done with liquid liquids.
POROSITY OF VARNISHED CANS
You can also apply this same test on an empty can. In other words, without bottom and with the lid already placed. The test liquid to be used is the same as before. It will be operated as follows:
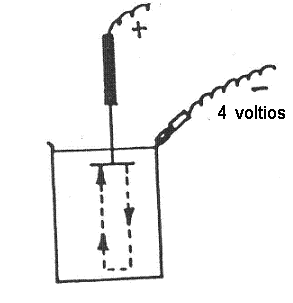
If the can is varnished inside and printed and / or varnished on the outside, the first thing is to scrape a piece of flange until there is exposed metal. Fill the pot with the electrolyte, without reaching the scraped area, connect the cathode to the exposed area of the flange. Then introduce the platinum anode in the liquid and slowly raise and lower it. See drawing no. 5. The period under current will depend on the size of the boat.
Drawing nº 5: Positive electrode travel in the boat
As guidance you can take:
– Packages ¼ (small) = 4 seconds (2 sec, lowering the electrode and 2 sec.
– Packages ½ (medium) = 6 seconds (3 sec, lowering the electrode and 3 sec.
– Package 1/1 (large) = 8 seconds (4 seconds down and 4 seconds up)
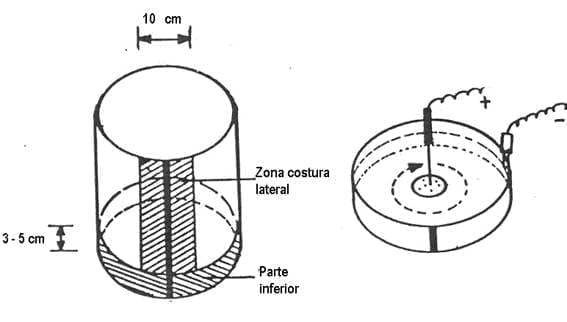
The very large cans – type 3 and 5 Kgs. – are cut and controlled as follows. See figure # 6.
Drawing nº 6: Cutting areas in very large cans and test bottom
Bottom: The base is cut at a height of 3 to 5 cm and filled with electrolyte, the cathode is placed on the scraped edge and the anode is placed in the liquid and moves in circles for 5 seconds.
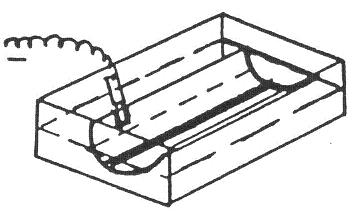
Part of the side seam of the body: Cut it in a width of about 10 cm – see drawing 7 – and insert it into a plastic or porcelain tray, never metal and cover it with the liquid test. The cathode is connected to the can body in a scraped area, and the anode connected to the stream moves slowly over the seam for 5 seconds.
Drawing No. 7: Porosity test on the side seam
Evaluation: After the test, no areas of varnish or pores should appear in large quantities in any of the areas tested.
It must not exceed 20 pores per dm2 both inside the body and on the lid.
No pores should be seen in the entire side seam protected with varnish






0 Comments