A canner – canner, filler, etc. – You must define your policy in relation to the quality of your raw materials, among which are metal cans.
In relation to these – or to any other product – you can take several positions:
a) Full confidence – without further inquiries – in the quality of the cans supplied, considering it adequate for the purpose for which they are intended. Therefore, it does not establish any type of control and only when a problem arises that is attributable to them, either during the filling process or later, does the supplier present the appropriate claim. This can arise in several circumstances:
– When you do not want to incur any kind of costs.
– When the supplier deserves full guarantee.
– When the type of product to be packaged, the risk is minimal.
b) Mount a reception control. For this, it is necessary to establish standards, agreed or not with the supplier, that adequately determine the procedure to be followed and the assessment of foreseeable defects. We will return later on about it.
c) Establish a concerted quality system, negotiated and perfectly defined with the supplier. By this, the level of quality that the container manufacturer commits to serve with absolute security is determined. In this case, continuous monitoring is not required, but sporadic audits to confirm that the agreed upon is adequately met.
d) Define your own system according to your needs. Here there are multiple solutions, such as spot sampling, waste control, ISO standards, etc …
Criterion a) is increasingly used less, its use being reduced to small companies. Nowadays any company that worries about the quality of its products will opt for options b), c) or d).
By way of example we develop in more detail the possibility b), that is to say the establishment of some “Norms of reception of cans of tinplate” on the part of a packer. For this we describe what could be the draft of these standards.
Before developing this draft, it is worth mentioning the following:
– The data set therein should be taken as guidance. Therefore the NCA values, lot size, sampling plan, etc. they are only purely indicative. They will have to be adjusted to the specific needs of each case.
– The same applies to the defect classification lists. They can also be extended or reduced depending on the specific circumstances of each process.
BORRADOR de NORMAS DE RECEPCIÓN DE ENVASES DE HOJALATA
I.- OBJECTIVE AND FIELD OF APPLICATION
The purpose of these Norms is to define the technical conditions that tinplate cans supplied by ———————- must meet to the Society —— —————-
The characteristics that are indicated in these Norms are definitive, admitting the tolerances that are specified in each case.
II.- BASIC MATERIALS :
II.1.- HOJALATA: Flat steel product, low carbon content, covered with tin on both sides, applied by electrodeposition.
II.2.- VARNISHES : Organosol, vinyl, epoxyphenolic or equivalent organic food coating.
II.3.- SEALANT COMPOUND : Solution to feed it with special rubber and resin based on water used to produce, once dry, a hermetic seal. It must withstand the sterilization process of the cans.
III.- CLASSIFICATION AND DESCRIPTION OF DEFECTS
III.1.- DEFINITION OF DEFECTS
III.1.1.- Class A defects (Critical): Acceptable quality level NCA = 0.40% (according to “Military Standard” tables – Military Standard)
Defects that render the container unusable for normal use, or that affect the quality of the product or packaging. They include all those that affect the hermeticity or that prevent the packaging from being packaged.
III.1.2.- Class B defects (Major): NCA = 4.0%
Defects that suppose certain risk in the cans that present them, but that in normal conditions do not prevent their use as such.
III.1.3.- III. 1.3.- Class C defects (Minors): NCA = 6.5%
Defects that affect the presentation of the packaging, without damaging the production process of the line or the quality of the product.
NOTE: Defects clearly resulting from tampering or critical transportation conditions (before unloading, after factory acceptance, etc.) are not taken into consideration.
III.2.- DESCRIPTION OF VISUAL DEFECTS
III.2.1.- DEFECTS OF CLASS “A”
III.2.1.1.- PACKAGING
A.1 Non-tight container (1)
A.2 Metal breakage or perforation
A-3 False closure
A.4 Major deformation of the tab that makes closure impossible.
A-5 Total lack of interior varnish
A-6 Erroneous, missing or illegible decoration
A-7 Decoration inside
A-8 Mixed decoration
A-9 Internal adherent dirt
III.2.1.2.- TAPAS / FUNDS
A.1 Metal drilling
A-2 Major deformation of the curl that makes closure impossible
A.3 Absence of compound in all the periphery or in some sector thereof.
A.4 Internal adherent dirt
A.5 Decoration inside
A-6 Fractured rivet (Easy opening lid)
A-7 Fractured incision (easy opening lid)
A-8 Cover without ring (Easy opening lid)
III.2.2.- DEFECTS OF CLASS “B”
III.2.2.1.- PACKAGING
ENVASES
B.1 Container height outside tolerances (2)
B.2 Light deformation of the flange
B.3 Externally oxidized cans
B.4 Scratched interior varnish
B.5 Detachment of interior varnish before or after sterilization.
B.6 Partial lack of interior varnish
B.7 Total absence of one of the inks used in decoration.
B.8 Defective or off-center decoration
B.9 Internal dirt
III.2.2.2.- TAPAS / FUND
B.1 Damaged curl
B.2 Outside diameter of the loop out of tolerances (2)
B.3 Curl height outside tolerances (2)
B.4 Deformations or dents that cause interruptions in the line, but do not compromise the closure.
B.5 Scratches or faults of the interior varnish
B.6 External oxidations
B.7 Deformed rivet (Easy opening lid)
III.2.3.- DEFECTS OF CLASS “C”
III.2.3.1.- PACKAGING
C.1 Corps damaged or hit
C.2 Deformation of the background panel
C.3 Weak cordon
C.4 Wrinkled tab
C.5 Variation of color tonality
C.6 Stained decoration
C.7 Absorption of water by lithography
C.8 Small scratches in the decoration
C.9 Partial absence of one of the inks used in decoration
C.10 Exterior dirt
III.2.3.2.- TAPAS / FUNDS
C.1 Wavy curl
C.2 Compound weight outside tolerance
C.3 Serious variations of tonality
C.4 Absorption of water by lithography
C.5 Small scratches on the decoration
C.6 Partial absence of one of the inks used in decoration.
C.7 Exterior dirt
NOTES
(1): The tightness is controlled by subjecting the container to a minimum pressure of 1 kg / cm2
(2): Dimensions that are controlled with a king’s foot.
IV.- RECEPTION CONTROL PROCEDURE
IV.1.- DEFINITION OF LOT
It is taken as such the amount of cans, and / or caps, contained in a truck.
IV.2.- APPLICATION
It can be applied to each lot by means of a statistical sampling plan determined by Military Standard MIL-STD-105D (Sampling Tables and Procedures for Attribute Inspection).
IV.3.- SAMPLING PLAN
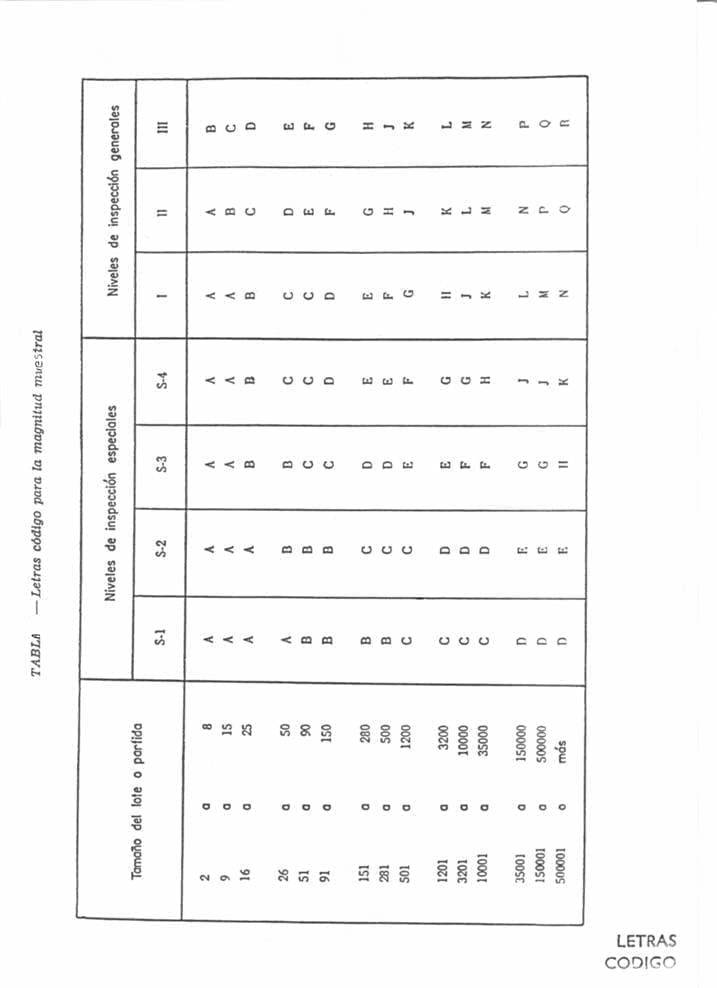
Once the lot size is known, the Sampling Plan is determined by Inspection Level I and simple sampling for Normal Inspection. (“General inspection levels”). See below table “Letters code for the sample magnitude”. Known the size of the batch and the level of inspection, this table defines the corresponding “code letter”, necessary to determine the magnitude or sample size.
IV.4.- ACCEPTABLE QUALITY LEVEL (NCA)
It is defined as the maximum percentage of defective units of a heading, previously established in Section III of these standards, according to the degree of severity of the defects examined.
IV.5 DEFINITION OF SAMPLE
Set of units drawn from a random game, for examination.
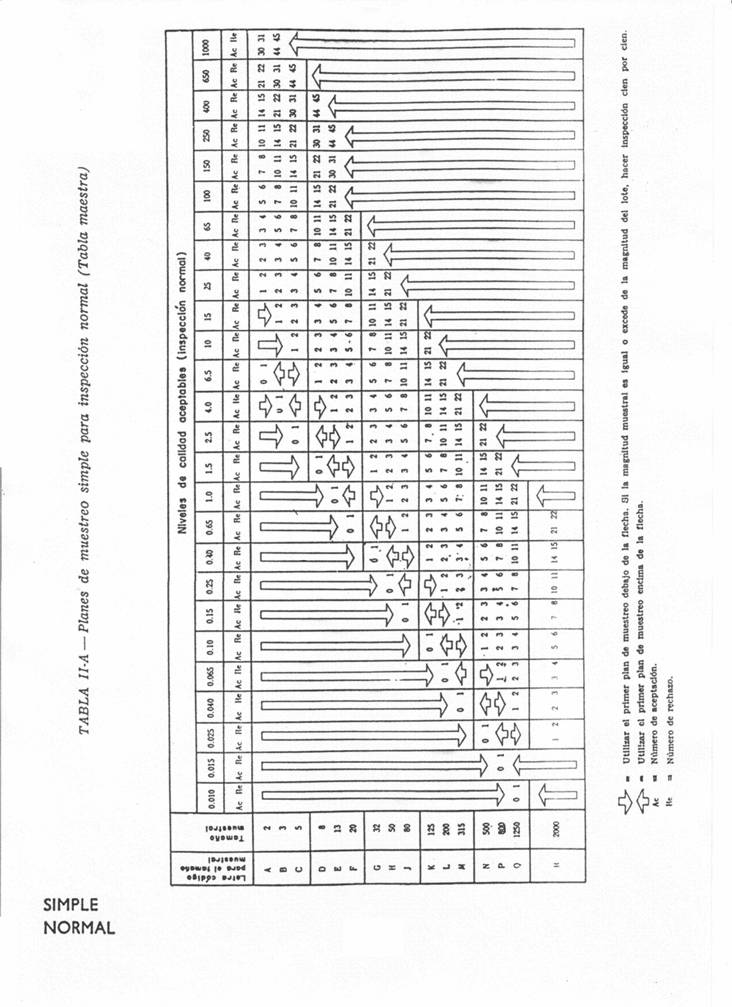
The number of units contained in the sample is called SAMPLE SIZE. Its value is determined by means of the attached Table II-A. For this you need to know the NCA – defined above according to the type of defects – and the code letter that we have already determined according to the “size of the lot” (for example a truck) and the level of inspection (level I) as stated in section IV.3 SAMPLING PLAN
Table II-A defines the number of defective samples according to the NCA that determine the acceptance or rejection of the lot.
IV .6.- SAMPLING
Knowing the number of pallets that make up the item (B) and once the SAMPLE SIZE (C) is determined, the following formula will be applied
A = 3C / B; where A = Number of units to take from each pallet.
This means that it will be sampled every 3 pallets (3rd, 6th, 9th …
The figure A will be rounded to the upper or lower whole number if it results in a higher or lower fraction, respectively, than 0.5.
The missing units to complete the Sample Size will be taken from the last pallet.
NOTES:
-For dimensional or destructive tests, one of the “special inspection levels” of the above-mentioned table may be chosen, for example the S-1 level
– The Standards must be completed with the corresponding technical sheets of the cans and covers, as well as with the appropriate sheets of the Military Tables. The latter are attached below (Only those mentioned in this draft)








0 Comments